
Efficient Elements. Click. Done.
Efficient Elements for presentations
Handbook

Efficient Elements. Click. Done.
Imprint
Contact
Efficient Elements GmbH
Rathausplatz 1
85579 Neubiberg
Germany
+49 89 9545 980-0
www.efficient-elements.com
Managing Directors
Felix Dollinger, Dr. Bastian Schittny
Headquarters
Neubiberg, Germany
Commercial Register
Munich, Germany, HRB 253953
©2008–2020 Efficient Elements GmbH
The use of registered names, trademarks, etc. in this publication does not imply, even in the absence of
a specific statement, that such names are exempt from the relevant laws and regulations and therefore
for general use.
Efficient Elements. Click. Done.
Contents
Contents .................................................................................................................................................. 3
Introduction ............................................................................................................................................ 6
Welcome ............................................................................................................................................. 6
Installation .......................................................................................................................................... 6
Update ................................................................................................................................................ 8
Settings ............................................................................................................................................... 9
EE Task Pane, EE Button and EE Home Menu .............................................................................................. 9
Assign Shortcuts .................................................................................................................................................. 9
Edit Efficient Elements for presentations templates ................................................................................ 10
Quick Tour ............................................................................................................................................. 12
Presentation ..................................................................................................................................... 13
Wizards .............................................................................................................................................. 14
Smart Elements ................................................................................................................................ 16
Project plan (Gantt Chart) .............................................................................................................................. 16
Productivity Tools ............................................................................................................................ 16
Position | Size | Shape ..................................................................................................................................... 16
Color .................................................................................................................................................................... 17
Text ...................................................................................................................................................................... 17
Navigation & View ............................................................................................................................. 17
Reference .............................................................................................................................................. 18
Presentation ..................................................................................................................................... 18
New Presentation ............................................................................................................................................. 18
Check .................................................................................................................................................................. 19
Save and Send .................................................................................................................................................. 20
Wizards .............................................................................................................................................. 21
Agenda Wizard .................................................................................................................................................. 21
Master Wizard .................................................................................................................................................... 22
Element Wizard ................................................................................................................................................. 23
Text Wizard ........................................................................................................................................................ 24
Format Wizard ................................................................................................................................................... 26
Smart Elements ................................................................................................................................ 28
Project plan (Gantt Chart) .............................................................................................................................. 28
Position ............................................................................................................................................. 31
Align ..................................................................................................................................................................... 31
Distribute Horizontally .................................................................................................................................... 31
Distribute Vertically .......................................................................................................................................... 31
Swap ................................................................................................................................................................... 31
Dock .................................................................................................................................................................... 32
Stack ................................................................................................................................................................... 32
Golden Canon ................................................................................................................................................... 32
Size .................................................................................................................................................... 33
Magic Resizer ..................................................................................................................................................... 33
Efficient Elements. Click. Done.
Width / Height / Width and Height ............................................................................................................... 33
Stretch ................................................................................................................................................................ 33
Fill ........................................................................................................................................................................ 34
Shape ................................................................................................................................................ 34
Align Process Chain ......................................................................................................................................... 34
Align Angles ....................................................................................................................................................... 34
Adjust Pentagon Headers ............................................................................................................................... 35
Align Block Arrows ............................................................................................................................................ 35
Align Rounded Rectangles ............................................................................................................................. 35
Color .................................................................................................................................................. 36
Set Fill Color ...................................................................................................................................................... 36
Set Line Color .................................................................................................................................................... 36
Set Font Color ................................................................................................................................................... 36
Color Bar ............................................................................................................................................................ 36
Pick Color from Screen .................................................................................................................................... 37
Convert to RGB.................................................................................................................................................. 37
Convert to Theme Colors ................................................................................................................................ 37
Text .................................................................................................................................................... 37
Set Margins ........................................................................................................................................................ 37
Fit Form to Text ................................................................................................................................................. 38
Wrap Text ........................................................................................................................................................... 38
Split Text Box ..................................................................................................................................................... 38
Spell Check ........................................................................................................................................................ 38
Merge Text Boxes .............................................................................................................................................. 38
Show / Hide Bullet / Numbering ................................................................................................................... 39
Decrease / Increase Indent Level .................................................................................................................. 39
Apply Default Bullets / Numbering ............................................................................................................... 39
Navigation & View ............................................................................................................................. 39
Hide Selected Objects ..................................................................................................................................... 39
Unhide Hidden Objects ................................................................................................................................... 39
Go to Slide .......................................................................................................................................................... 40
History – Previous / Next Slide ....................................................................................................................... 40
Expert Tools ...................................................................................................................................... 40
Insert Selected Slides as Pictures ................................................................................................................. 40
Show / Hide Slide Size ..................................................................................................................................... 40
Delete Redundant Masters ............................................................................................................................. 40
Copy Summary to Clipboard ......................................................................................................................... 40
Optimize Free form .......................................................................................................................................... 41
Select Similar Shapes ...................................................................................................................................... 41
Delete or Replace All Texts ............................................................................................................................. 41
Decompose Tables .......................................................................................................................................... 41
Paste on Selected Slides ................................................................................................................................. 41
Create Motion Path .......................................................................................................................................... 41
Print Only Used Notes Pages ......................................................................................................................... 42
Set Black and White Mode .............................................................................................................................. 42
Find in Windows Explorer ............................................................................................................................... 42
Set Style for New Style Elements .................................................................................................................. 42
Apply Template to Current Presentation .................................................................................................... 42
Admin Tools ...................................................................................................................................... 42

5
Contents · Welcome
Efficient Elements. Click. Done.
Update Thumbnails ......................................................................................................................................... 42
Tag Inspector .................................................................................................................................................... 42
Shape Dimensions ........................................................................................................................................... 42
Single Out Objects on Selected Slides ......................................................................................................... 43
Open EE Folders ............................................................................................................................................... 43
Administration ...................................................................................................................................... 44
Customization................................................................................................................................... 44
Deployment ...................................................................................................................................... 44
Support ................................................................................................................................................. 45
Frequently Asked Questions (FAQ) .................................................................................................. 45
E-mail Support .................................................................................................................................. 45
Training ............................................................................................................................................. 45

6
Introduction · Welcome
Efficient Elements. Click. Done.
Introduction
Welcome
Welcome to Efficient Elements. Please use this
handbook as a reference when working with Ef-
ficient Elements for presentations. We hope Effi-
cient Elements for presentations will make your
life with Microsoft PowerPoint a whole lot easier.
HINT: We recommend making use of the ‘Page
Thumbnails Panel’ of Acrobat Reader for easy navi-
gation through the document. You can open the
panel by clicking on the corresponding icon in the
top left corner of your Acrobat Reader window.
Installation
The installation of Efficient Elements for presen-
tations is very easy and takes only a few minutes.
System requirements
▪ Microsoft PowerPoint 2010 / 2013 /
2016 / 2019 or Office 365 (32- or 64-bit)
▪ Microsoft Windows 7 / 8 / 8.1 / 10
(32- or 64-bit)
▪ Microsoft .NET Framework 4.0 or newer
▪ Shared Network Drive / SharePoint 2013
or newer (on-premise) or SharePoint
Online (optional, only required for EE
Sync)
Download
You can download the installation file from our
website:
www.efficient-elements.com/downloads/
In case you already have received a license key,
you can insert it on the website indicated above
to check if there is a customer specific edition
available that has been customized to fit your
company’s corporate design. In case there is no
customer specific version available for you,
please contact us for further information on cus-
tomization options.
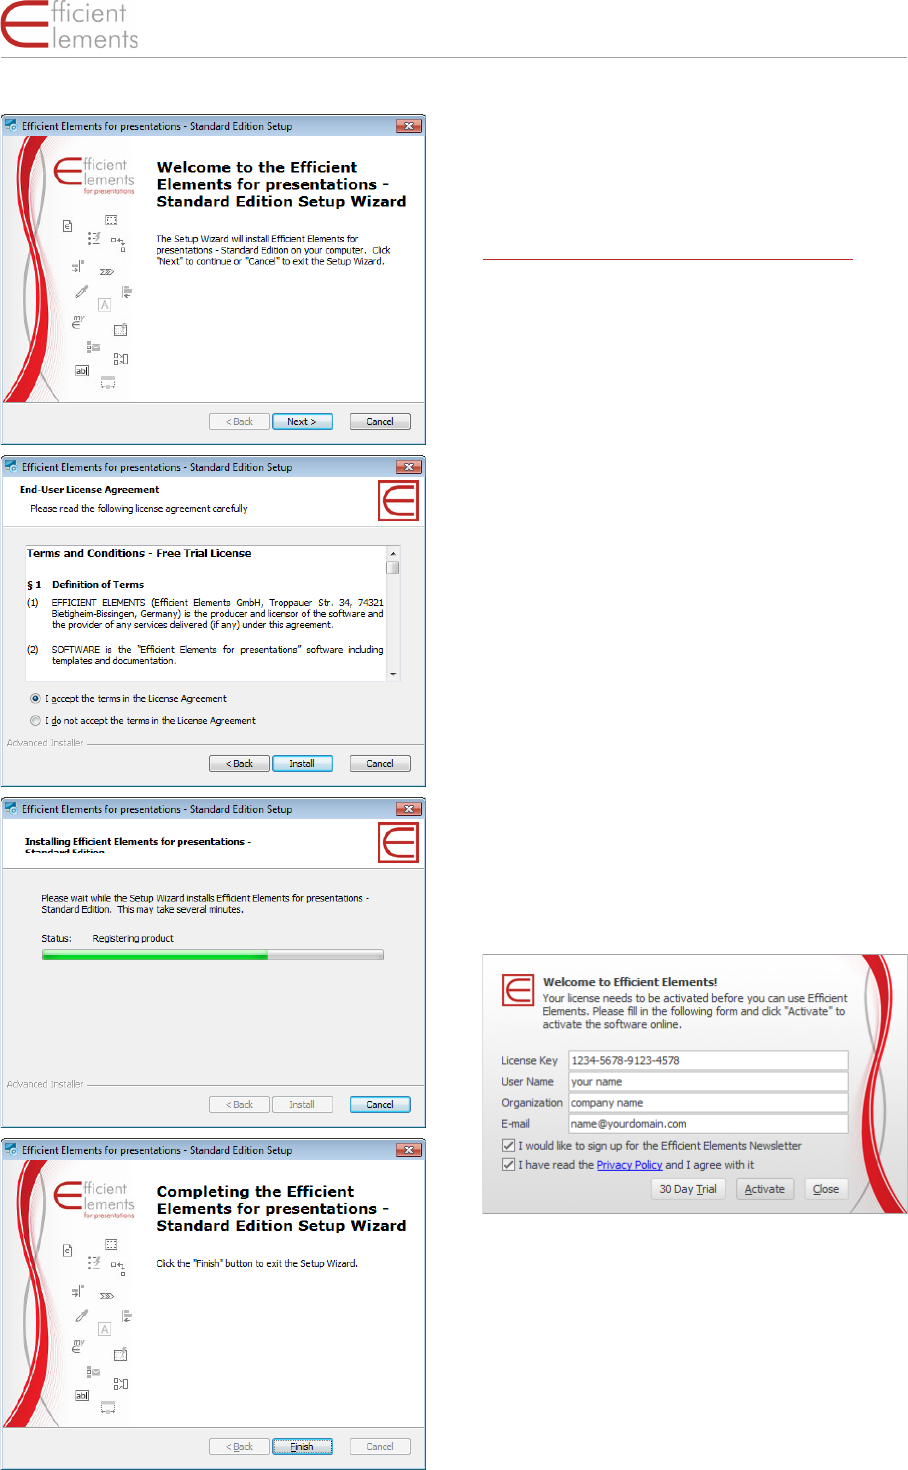
Installation
Once the download of either the generic edition
or the customer specific edition has been com-
pleted, please execute the installation file (msi).
The installation instructions will guide you
through the installation process.
HINT: If you are in a corporate environment,
please check with your IT department before in-
stalling Efficient Elements for presentations. Your
IT department might have to install the add-in for
you.
7
Introduction · Installation
Efficient Elements. Click. Done.
Our standard installer package is installed per-
machine and requires admin privileges.
If you do not have admin privileges you can
download our per-user installer package here:
www.efficient-elements.com/deployment
The default installation path of Efficient Ele-
ments for presentations depends on the instal-
lation type:
▪ Per-user installation:
Local Application Data
▪ Per-machine installation:
C:\Program Files (x86) and
D:\ProgramData
Activation
In order to use Efficient Elements for presenta-
tions, it is necessary to activate the product us-
ing a valid license key. To activate your license,
an internet connection is required. Once Effi-
cient Elements for presentations has been in-
stalled, it will prompt you to enter your license
information upon starting Microsoft Power-
Point. The computer will then establish a con-
nection with our license server. If for some rea-
son you should not be able to activate the prod-
uct during installation, you will be prompted the
next time you start Microsoft PowerPoint.
HINT: If you do not have a license key yet but wish
to start using Efficient Elements for presentations
right away, you may also choose the ‘30 Day Trial’
option. Once the trial period is over, you will be
prompted to insert your license key again.
You can use your license key as many times as
you need to re-install Efficient Elements for
presentations on your machine. Please make
sure your license key does not get stolen or
8
Introduction · Update
Efficient Elements. Click. Done.
passed on to anyone. We will keep track of all in-
stallations and not tolerate license abuse.
Activation in corporate network
Should your company network not permit an
automatic activation, please contact us. We will
discuss the possibilities for activation within
your corporate network with your IT depart-
ment.
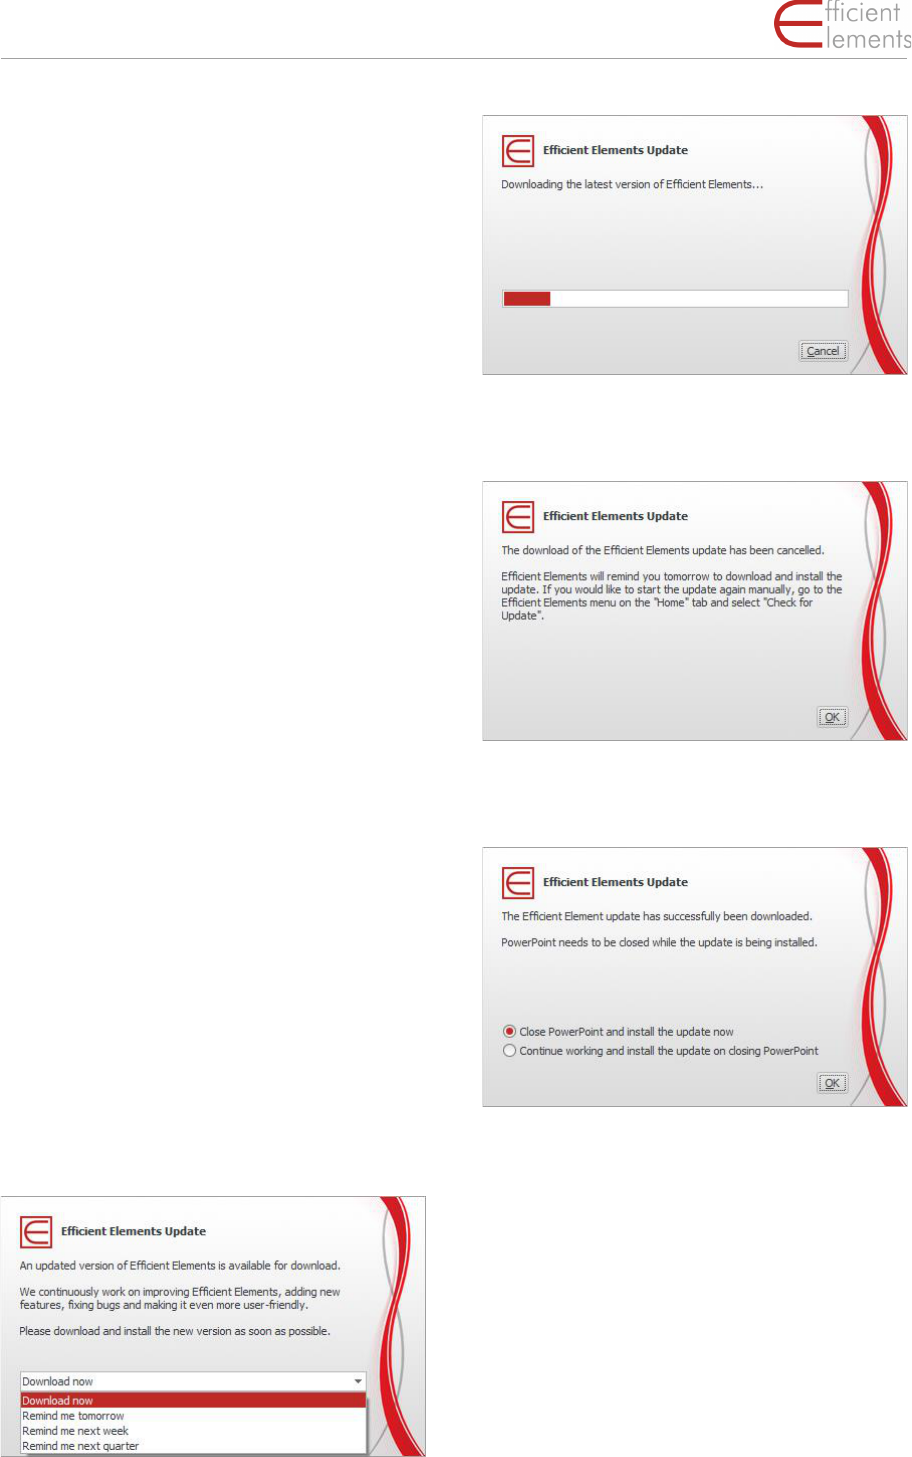
Update
From time to time a new version of Efficient Ele-
ments is published that contains either new fea-
tures or bug-fixes. In case you are using a cus-
tomer specific edition of Efficient Elements, an-
other reason for updates may be that there have
been changes to your corporate design which
have been carried over to the templates in your
specific edition of Efficient Elements. In either
case we recommend installing these updates to
further improve your experience with Efficient El-
ements for presentations.
HINT: If you are in a corporate environment, up-
dates may automatically be installed through
your IT department. Please check with your IT de-
partment before installing any update.
For standard per-user-installations, you will be
automatically informed by the software, once an
update is available. If there is an update availa-
ble, you will be prompted to download the up-
date shortly after starting PowerPoint. You can
choose to start the download right away or post-
pone the update to a later point in time.
In case you need to interrupt the download, you
will be prompted again the following day to re-
attempt the download.
After the download of the update has been com-
pleted successfully, you will need to close Pow-
erPoint before it can be installed.
Please make sure not to interrupt the installa-
tion process, as the installation might be cor-
rupted otherwise and you may not be able to use
the add-in until you have reinstalled it manually.
9
Introduction · Settings
Efficient Elements. Click. Done.
Settings
EE Task Pane, EE Button and
EE Home Menu
Show | Hide the EE Task Pane
After installing Efficient Elements you should
find a task pane labeled 'EE' or 'Efficient Ele-
ments' on the right side of the PowerPoint win-
dow. If needed, you can close the EE Task Pane
by clicking on the 'x' located in the top right cor-
ner of the task pane. To open the EE Task Pane
again, please click on the EE Button located on
the left side of the PowerPoint 'Home' tab.
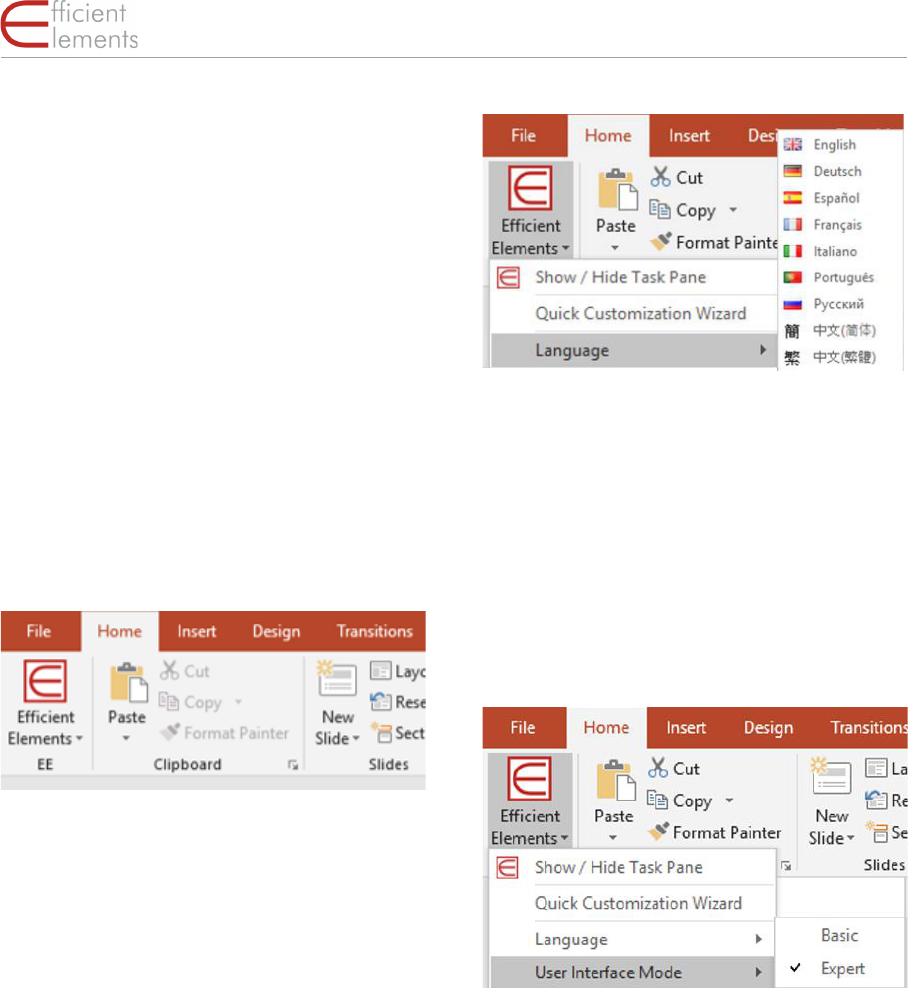
Language settings
It is possible to change the language of Efficient
Elements for presentations. You will find the lan-
guage setting in the EE Home Menu located be-
low the EE Button on the left side of the Power-
Point 'Home' tab. Currently the following lan-
guages are available:
▪ English
▪ French
▪ German
▪ Spanish
▪ Italian
▪ Portuguese
▪ Russian
▪ Simplified Chinese
▪ Traditional Chinese
HINT: If your preferred language is not listed
above, please contact us. We might be able to
add your preferred language in a future update.
User Interface Mode
You can adjust the user interface of Efficient Ele-
ments for presentations. You will find the user in-
terface mode setting in the EE Home Menu lo-
cated on the left side of the PowerPoint 'Home'
tab.
The following presets are available:
▪ Basic – display only the most important
functions
▪ Expert – the default setting displaying all
functions
HINT: If you would like to make further adjust-
ments to the user interface, we can offer you a
customized edition of Efficient Elements. Please
contact us for more information.
Assign Shortcuts
It is possible to assign your personal shortcuts to
each of the buttons on the EE Task Pane. To do
so, right-click on the button to be assigned and
choose ‘Assign Shortcut’. The ‘Assign Shortcut’

10
Introduction · Settings
Efficient Elements. Click. Done.
dialog will appear. Simply follow the instructions
in the dialog to assign your preferred shortcut.
HINT: Please note that your personal shortcut will
have priority over any built-in shortcut.
In case you wish to remove a shortcut, right-click
again on the respective button and click ‘Re-
move Shortcut’.
Keyboard Shortcuts
available assigned
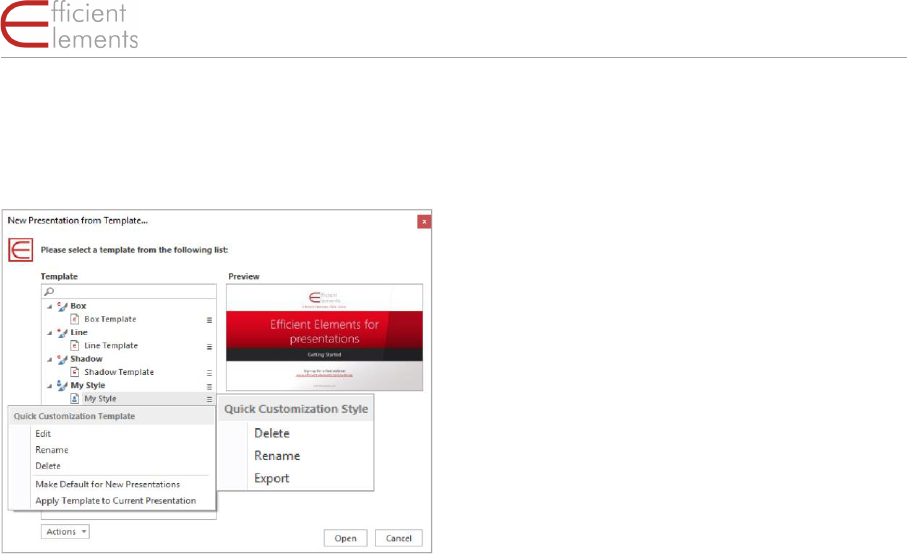
Edit Efficient Elements for presenta-
tions templates
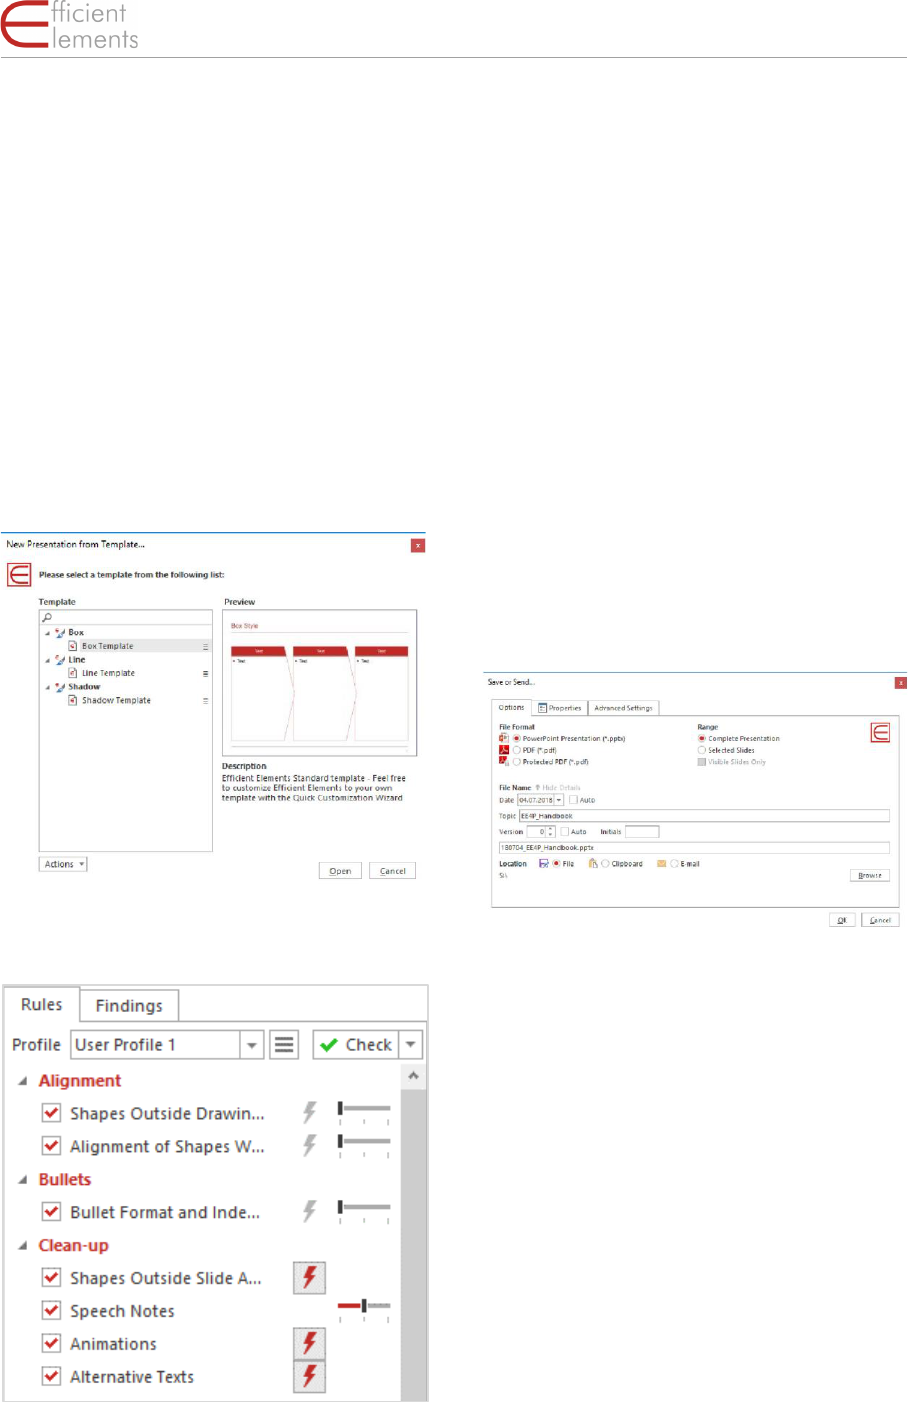
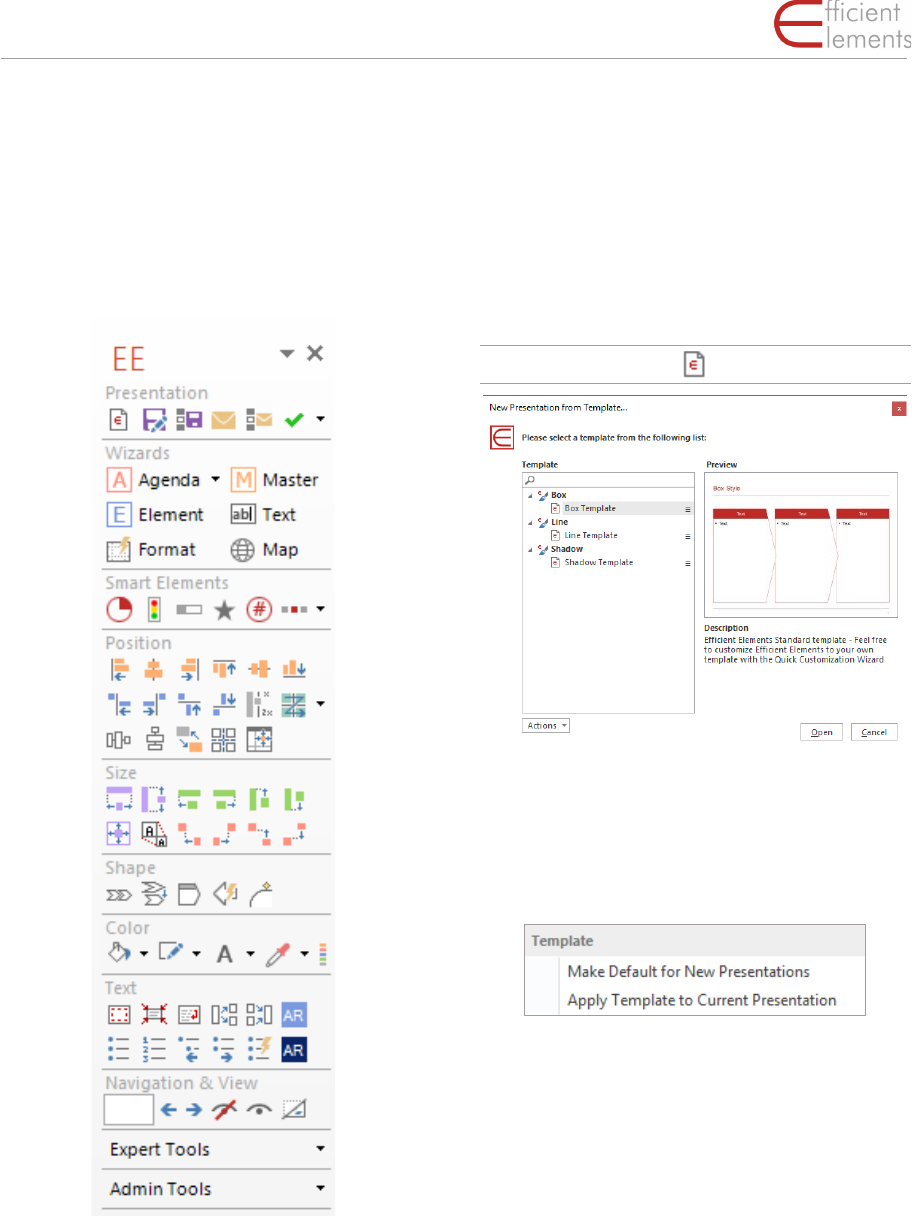
You can adjust the templates integrated in Effi-
cient Elements. To do so, click on the file icon ‘E’
on top of the EE Task Pane to open the ‘New
Presentation’ dialog.
Select one of the templates (e.g. ‘Box’ in the ex-
ample above) and open it. Or click at the little
menu to the right of the template and choose
one of the following commands:
Click on ‘Make Default for New Presentations’ if
you would like PowerPoint to automatically
open this template for you when you start Power
Point. The template will be copied to the Mi-
crosoft ‘Templates’ folder.
By the ‘Actions’ menu it is possible to add your
current presentation to the template list or to
‘Import a Style Package’. It is only possible to im-
port EE4P-Style Packages.
11
Introduction · Settings
Efficient Elements. Click. Done.
There are some more features applicable to im-
ported Style Packages and Quick Customization
styles:
Select ‘Edit Template’ to make adjustments to
the selected template, e.g. insert a logo or edit
the color palette. The template will be opened in
PowerPoint and can be adjusted like any other
PowerPoint file. Please note that these changes
cannot be undone once you have saved and
closed the template. If in doubt, please save a
backup-copy before making any changes.
To export the Style Package or Quick Customiza-
tion style choose the style and not the template
and click on the little menu to the right.
12
Quick Tour · Settings
Efficient Elements. Click. Done.
Quick Tour
What is Efficient Elements for presentations?
Efficient Elements for presentations is an add-in
for Microsoft PowerPoint that helps you create
more professional presentations in less time.
What are the key benefits?
Increased quality of your presentation:
▪ Improved adherence to your Corporate
Design with no additional effort (or actu-
ally, even less effort)
▪ More precise alignment and sizing of
slide elements
Reduced effort in slide creation:
▪ A study with more than 100 users shows
a time saving of more than 2 hours per
week for an average user
1
.
1
Siemens Efficiency Study
In this ‘Quick Tour’, we will give you an overview
of the most important functions of Efficient Ele-
ments for presentation. For more detailed infor-
mation on how to use every single menu and
button, please check the ‘Reference’ section of
this handbook.
The user interface of Efficient Elements for
presentations – the EE Task Pane – is located on
the right side of your PowerPoint window. The
EE Home Menu is located below the EE Button on
the left side of the PowerPoint 'Home' tab.
For an explanation of the EE Home Menu and the
EE Button, please refer to the chapter ‘Settings’.
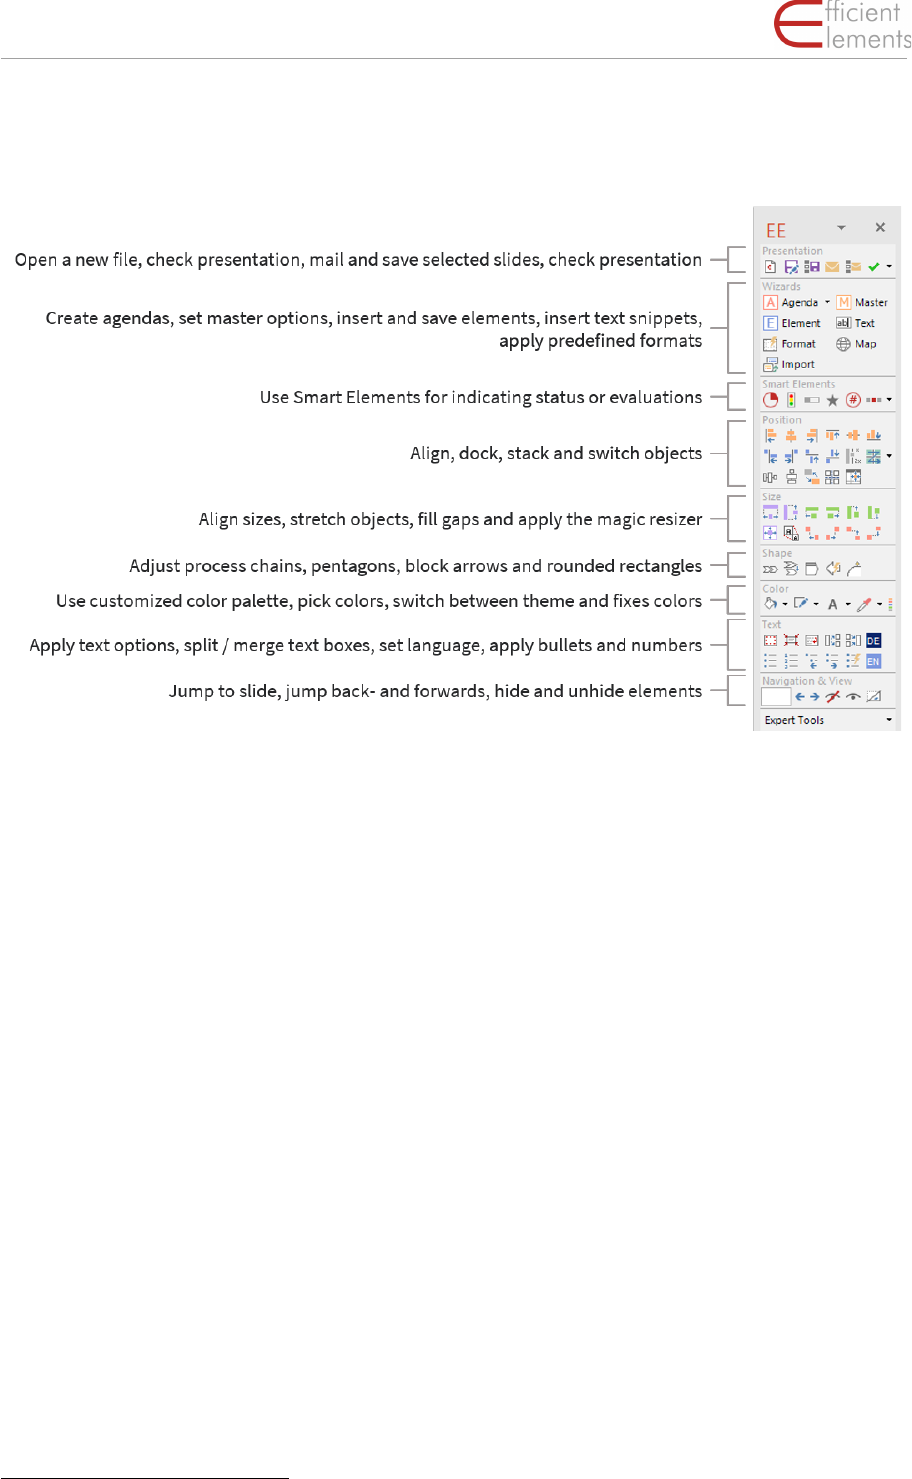
In the following, the eight main sections of the EE
Task Pane will be introduced:
13
Quick Tour · Presentation
Efficient Elements. Click. Done.
Presentation
In the ‘Presentation’ section you will find func-
tions pertaining to the presentation file.
New Presentation
Select a template to start a new presentation.
The available templates depend on your individ-
ual customization.
If you are working on an outdated presentation,
update the design by clicking on ‘Apply template
to entire presentation’ in the drop-down menu.
Check Presentation
Check your presentation for compliance with
your company’s corporate design and interac-
tively fix any issues with just one click. More than
25 rules – and your custom rules if needed:
▪ Corporate colors
▪ Corporate fonts
▪ Bullet formats
▪ Orphaned footnotes
▪ Double or missing spaces
▪ Proofing languages
Save or Send entire Presentations or Selected
Slides
Save the presentation as a PowerPoint, a PDF or
a protected PDF file. Or attach the chosen file
format to a new e-mail.
HINT: By saving the selected slides to the clip-
board you will be able to paste them into an exist-
ing e-mail. Of course you can also choose either
.pptx or .pdf when saving to the clipboard.
14
Quick Tour · Wizards
Efficient Elements. Click. Done.
Wizards
The ‘Wizards’ section provides you with a variety
of powerful functions. Please check the ‘Refer-
ence’ section of this handbook for a detailed de-
scription of each Wizard.
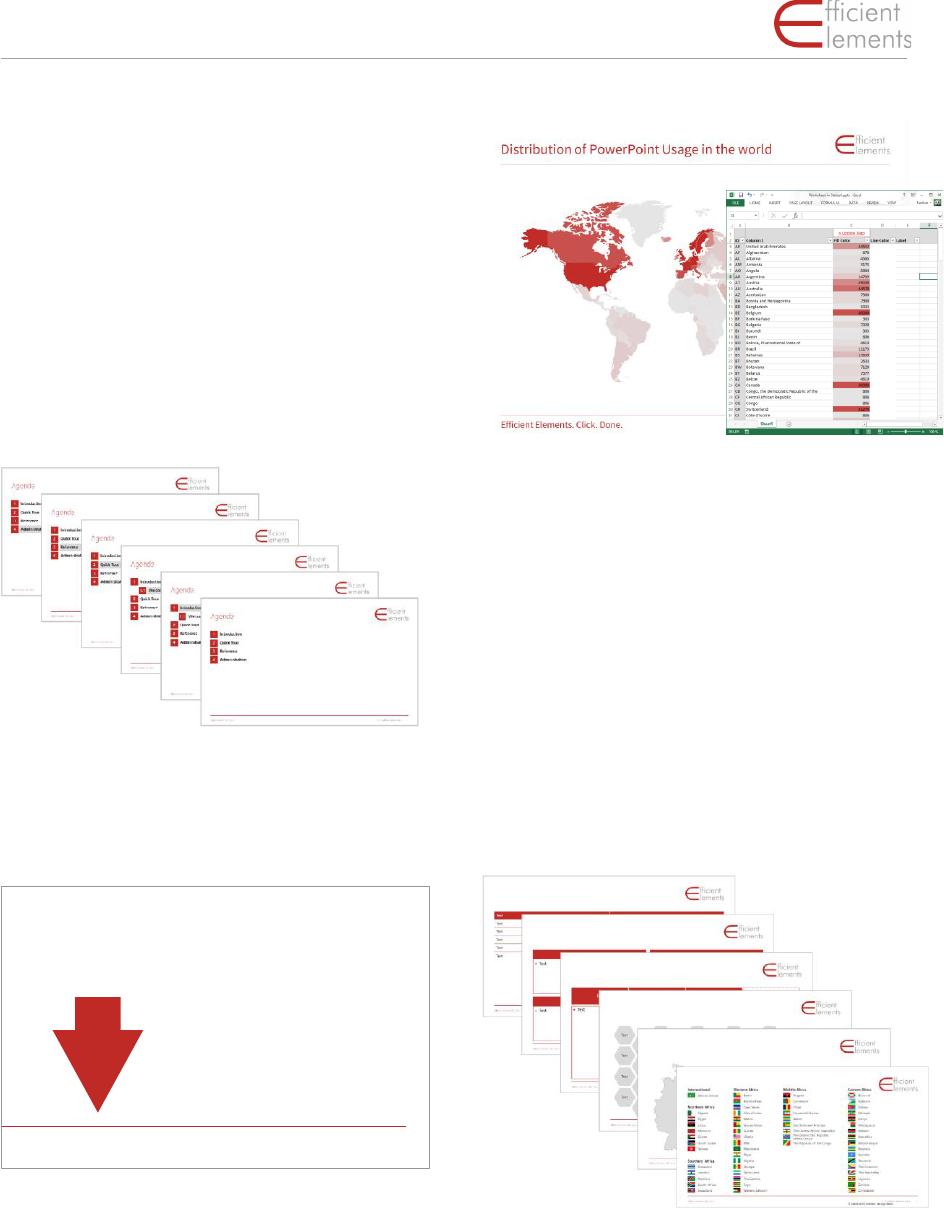
Agenda Wizard
Generate and change the agenda or content
pages for your presentation by one click.
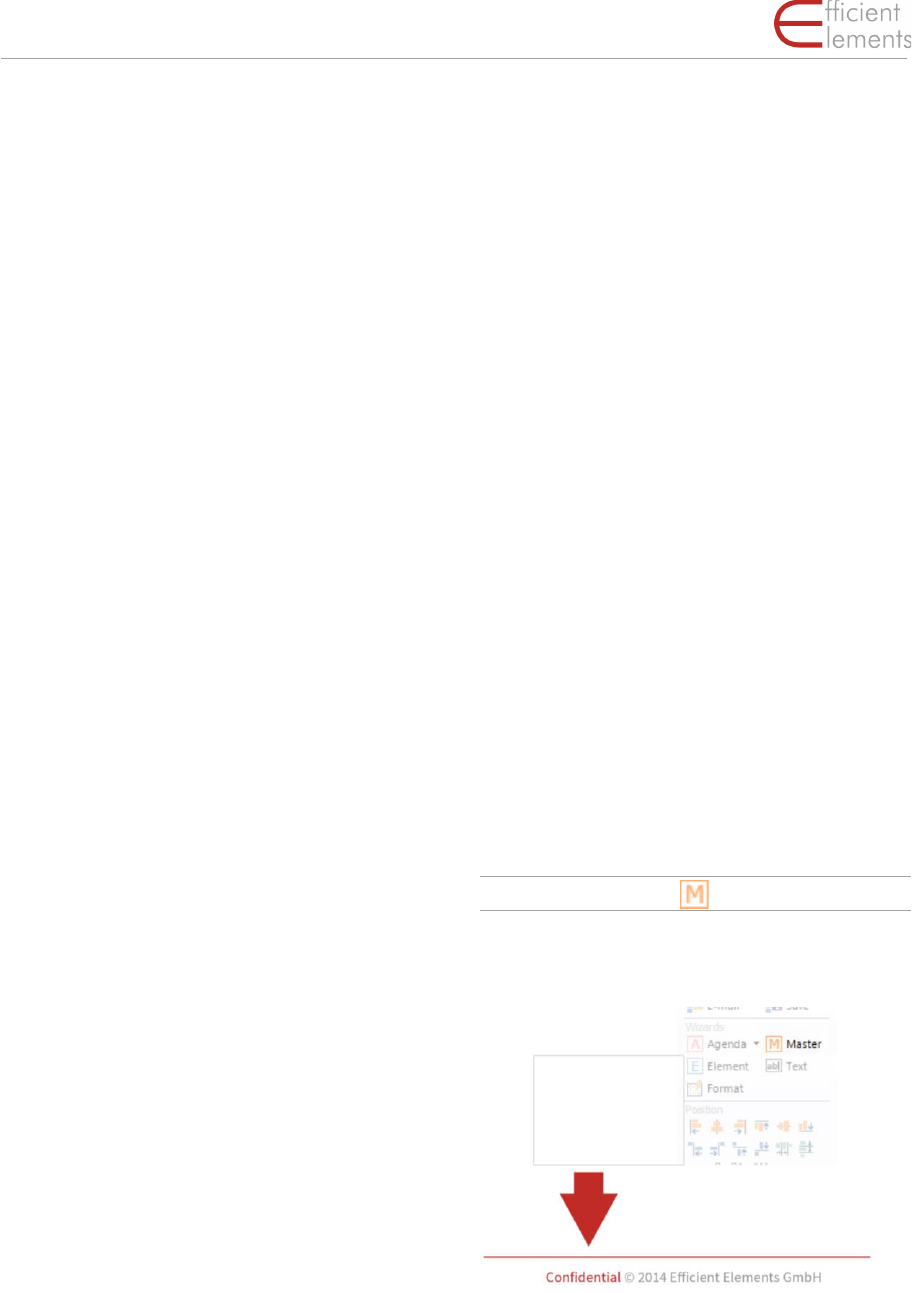
Master Wizard
Insert/remove elements in/from the slide mas-
ter.
Map Wizard
The Map Wizard allows you to format maps us-
ing Excel functionality.
HINT: Adjust fill and line color of individual coun-
tries manually using the Excel color palette … or
use Excel‘s Conditional Formatting function for
databased formatting (see example above)
You can create a label for each individual country
(e.g. data point or country name)
The Map Wizard will only recognize maps if they
are grouped – ungrouped maps can be fixed by
regrouping
Element Wizard
Insert elements from a comprehensive library in
the current slide.
Confidential © 2014 Efficient Elements GmbH
Efficient Elements. Click. Done.
for presentations
fficient
lements
13
Insert optional content in the slide master with a
single click of a button
Master Wizard
15
Quick Tour · Wizards
Efficient Elements. Click. Done.
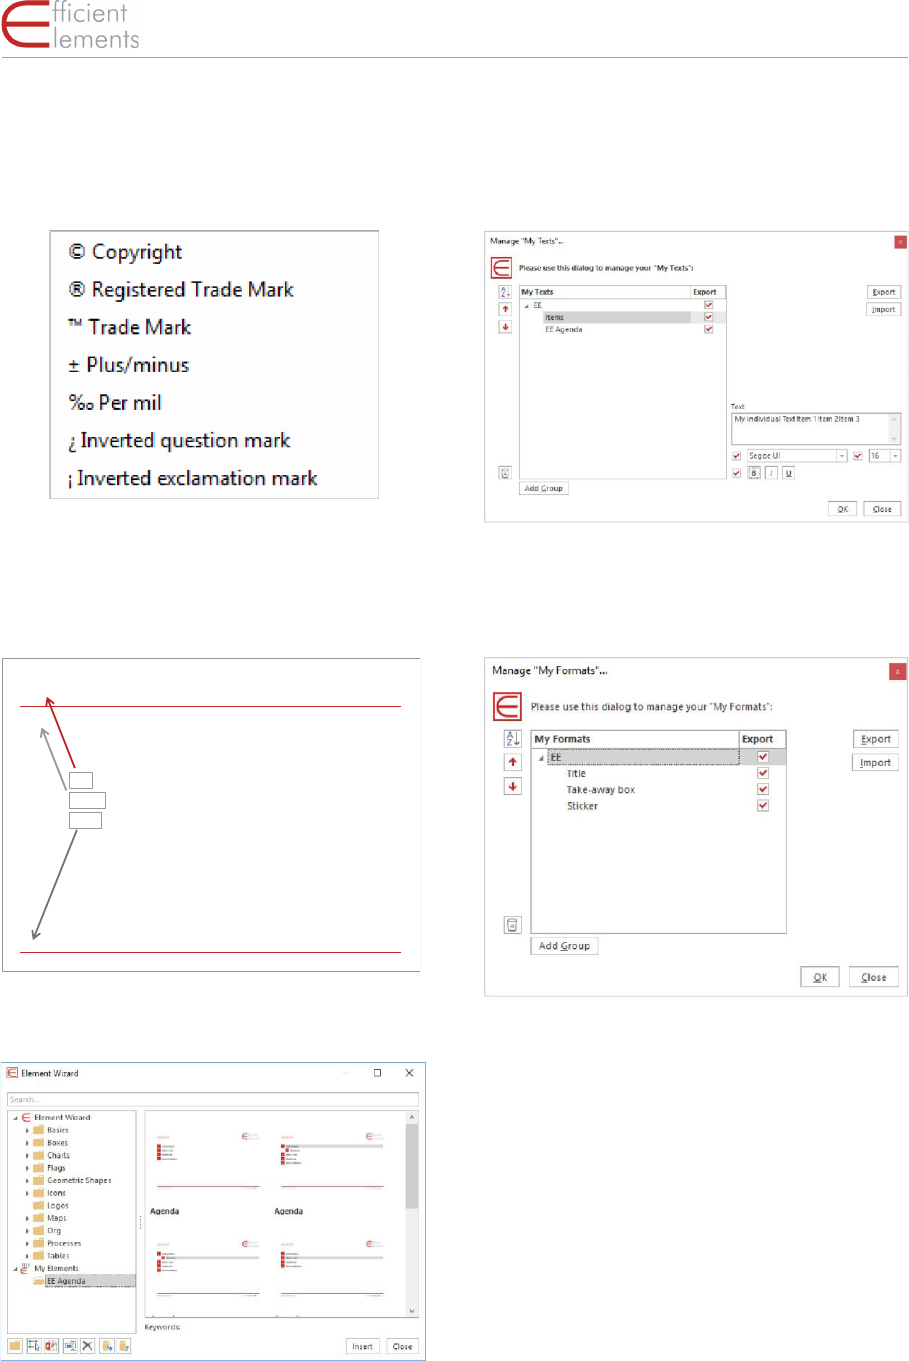
Text Wizard
Insert text snippets and special characters in the
current text range.
Format Wizard
Apply predefined formats/positions to any given
element.
My Elements
Easily reuse, manage and share your own favor-
ite elements …
Add/rename/delete folder, add selected slides
and entire presentations, sort elements per drag
and drop, export/import elements …
My Texts
Easily reuse, manage and share your own favor-
ite text snippets …
My Formats
… and formats.
© 2014 Efficient Elements GmbH
Efficient Elements. Click. Done.
for presentations
fficient
lements
17
Title
Subtitle
Source
Title
Subtitle
Source
16
Quick Tour · Smart Elements
Efficient Elements. Click. Done.
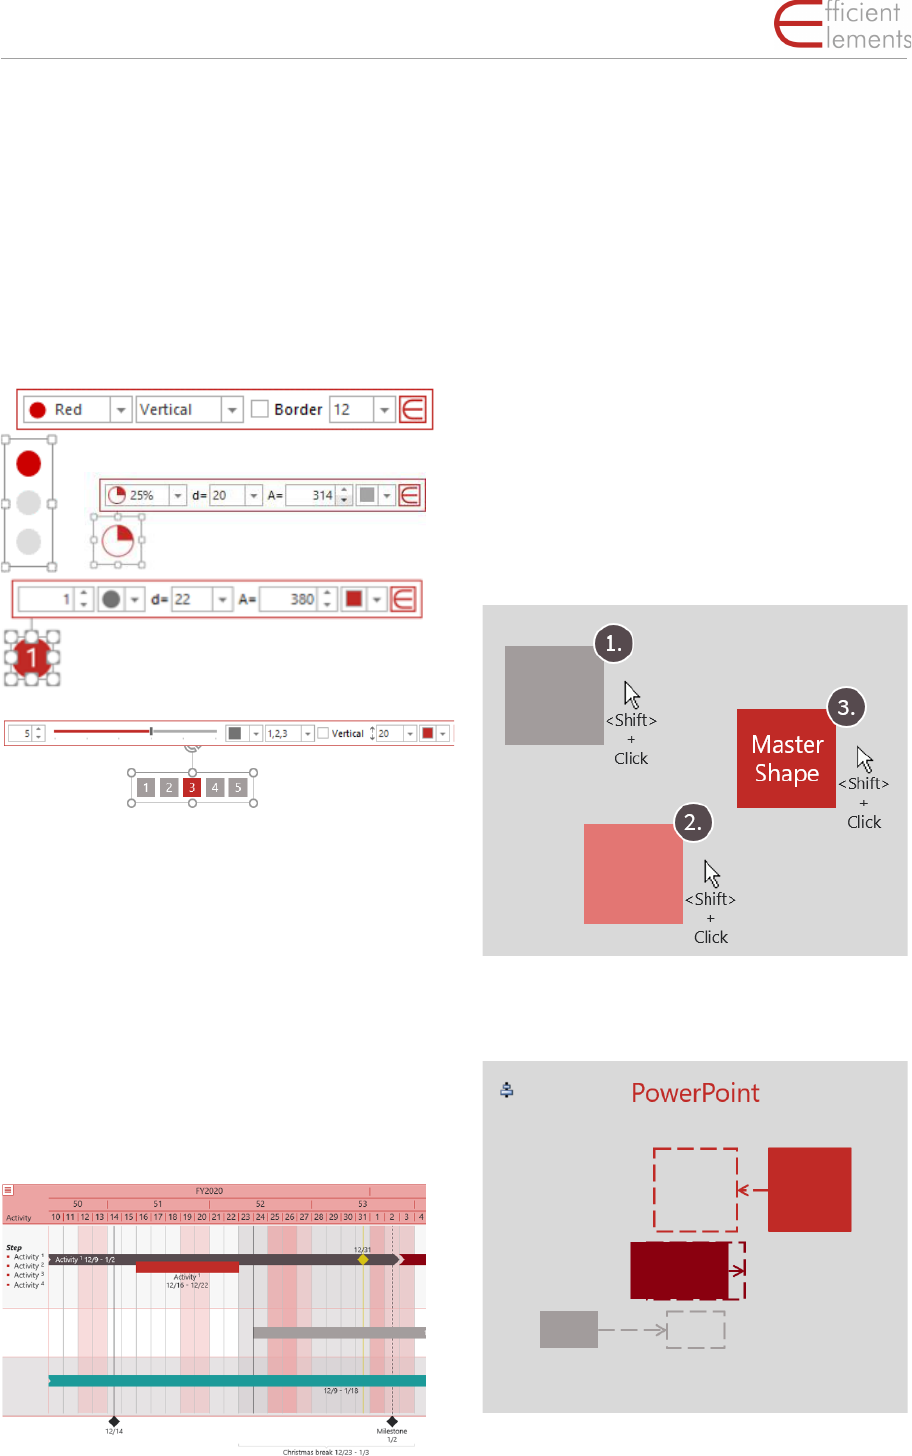
Smart Elements
Via the Smart toolbar you can change the set-
tings of Smart Elements directly on the slide:
▪ status information
▪ evaluations
▪ and status indication
HINT: Click on the EE symbol to close the Smart
toolbar in case it is in your way.
There will be more Smart Elements added in the
future.
Project plan (Gantt Chart)
Create detailed project plans with just a few
clicks. Adjust bars and milestones via drag &
drop. Color and label bars, arrows, chevrons,
milestones & position them.
Productivity Tools
Position | Size | Shape
The ‘Position’ section allows you precisely ar-
range objects on a slide. The ‘Size’ section pro-
vides you with all tools needed for adapting the
size of objects. The ‘Shape’ functions help you
make adjustments you would not be able to do
manually (e.g. align process chains and angles).
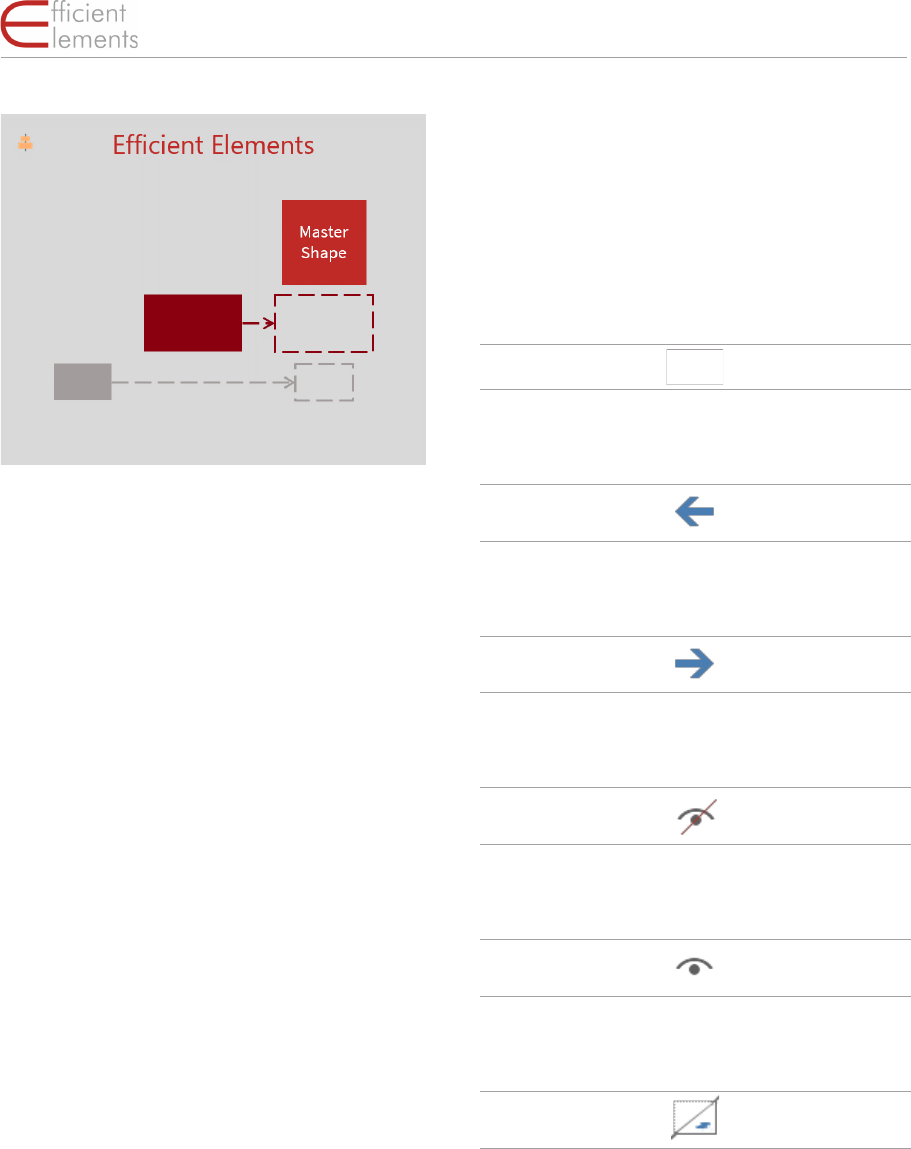
The Efficient Elements ‘Master Shape Concept’
makes alignment of shapes much more precise
and efficient. The shape that is selected last is
called ‘Master Shape’ and serves as a reference
point for many alignment and sizing functions.
The standard PowerPoint functions do not allow
for an alignment of objects with respect to an-
other specific object:
Efficient Elements lets you choose a reference
object in respect to which all other objects will
be aligned:
17
Quick Tour · Navigation & View
Efficient Elements. Click. Done.
Most of the position, size and shape functions
follow the “Master Shape Concept”.
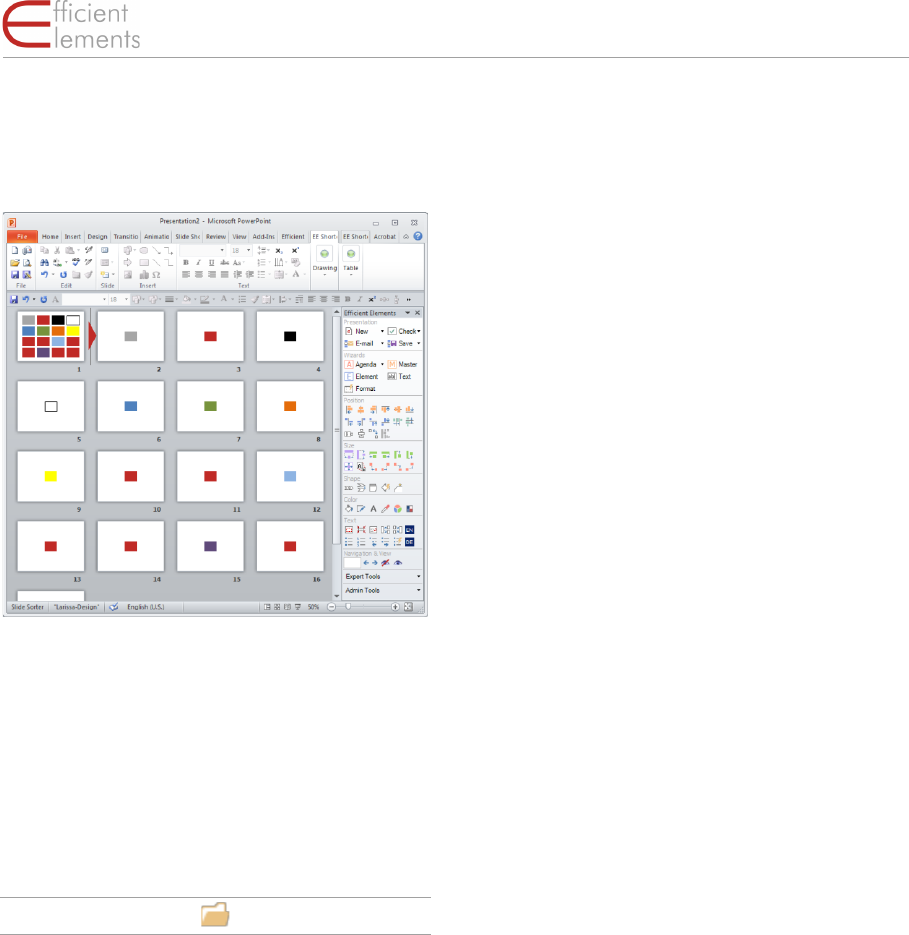
Color
Select a color from your custom color palette
and apply it to selected elements. Available col-
ors depend on your individual customization.
Pick colors from virtually any place on your
screen with the color picker tool. Either apply
color directly or store it in the recent color pal-
ette for later use.
Convert all theme colors in current selection to
RGB values to make the colors independent of
the slide master and theme used. Convert all
matching RGB values in current selection to
theme colors to automatically adapt to the slide
master and theme used.
Text
Functions needed to format text fields and boxes
can be found in the ‘Text’ section. For instance,
if you have trouble with getting the bullets in
your presentations to match your corporate de-
sign, you will love the ‘Bullet and Numbering’
features. One click and your bullets will appear
as they should.
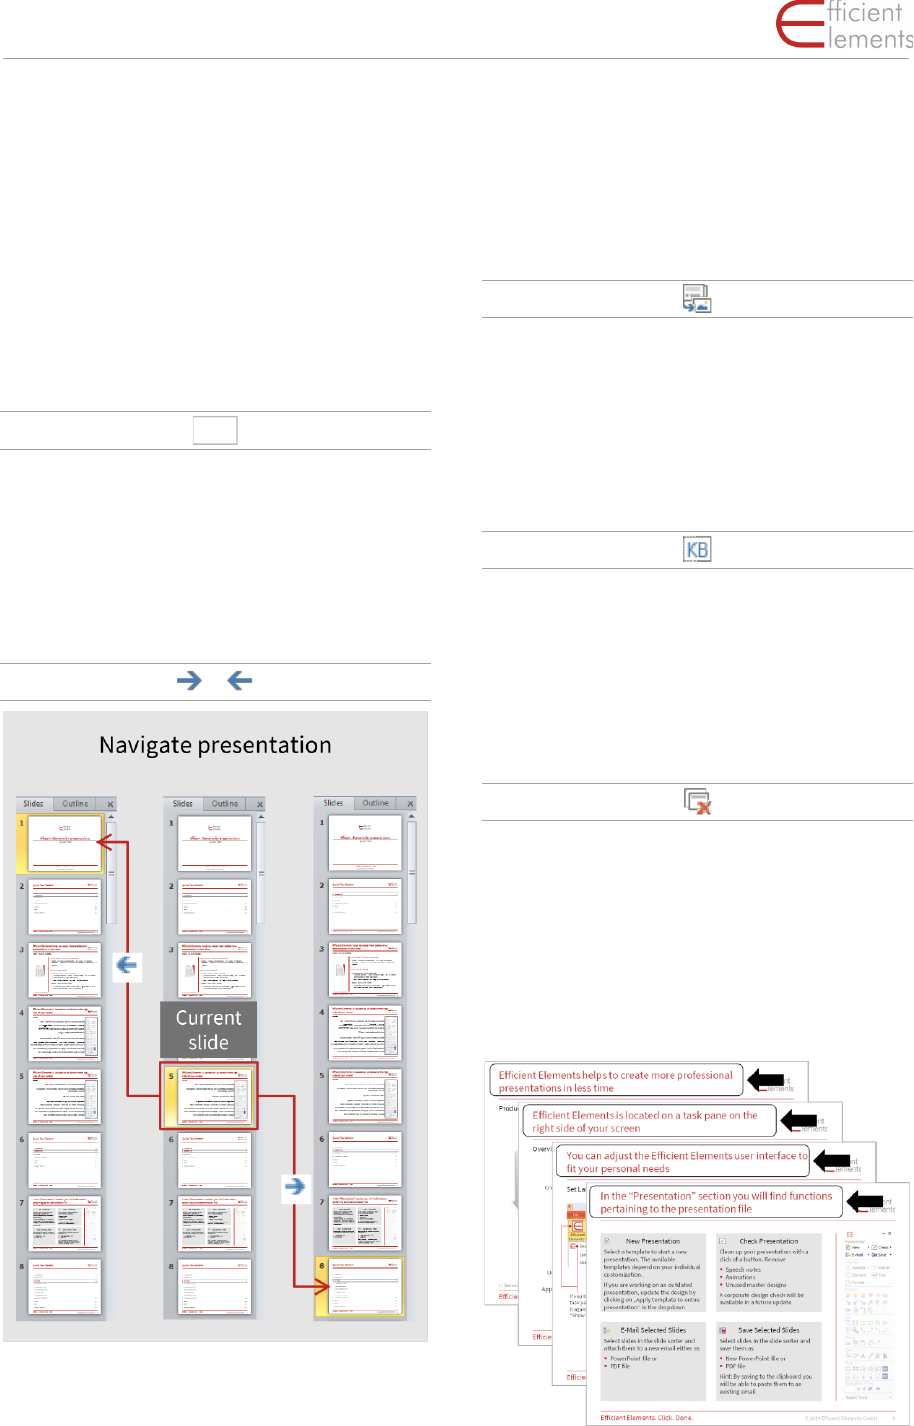
Navigation & View
Navigate long presentations quickly with the
“Navigation” functions and show / hide Objects
Enter number to jump to slide
Jump back to previous slide
Jump forward to next slide
Hide selected Objects
Unhide hidden Objects
Hide / Show Master Objects
18
Reference · Presentation
Efficient Elements. Click. Done.
Reference
The following pages will describe each feature of
Efficient Elements in detail. We will go through
the EE Task Pane from top to bottom.
Please note that this view corresponds to the
maximum feature set as provided by the user in-
terface mode “Expert” in the EE Home Menu.
If you are using a different user interface mode,
you may only see a subset of the features on
your EE Task Pane.
Presentation
New Presentation
Custom Styles and Templates
Open a new presentation based on one of your
corporate design’s templates.
Select one of the templates (e.g. ‘Box in the ex-
ample above) and either click on ‘Open’ or
choose one of the following ‘Actions’:
Click on ‘Make Default for New Presentations’ if
you would like PowerPoint to automatically
open this template for you when you start Power
Point. The template will be copied to the Mi-
crosoft ‘Templates’ folder.
Select ‘Apply Template to Current Presentation’
to apply the selected template to all slides in the
current presentation. This is useful, for instance,
if you would like to update an old presentation
to a new corporate layout or convert a presenta-
tion to a client’s PowerPoint template. Please
note that you might have to change some of the
contents manually to make them appear cor-
rectly in the new layout.

19
Reference · Presentation
Efficient Elements. Click. Done.
Quick Customization Templates
Templates created using the Quick Customiza-
tion Wizard and imported client templates can,
in opposite to the custom templates, be edited,
deleted and renamed.
Select ‘Edit Template’ to make adjustments to
the selected template, e.g. insert a logo or edit
the color palette. The template will be opened in
PowerPoint and can be adjusted like any other
PowerPoint file. Please note that these changes
cannot be undone once you have saved and
closed the template. If in doubt, please save a
backup-copy before making any changes.
‘Client- and Quick Customization-Styles’
To delete/rename/export a Client- or QCW-Style
click on the menu to the right of the desired
style.
Client and QCW styles cannot be edited.
Select "Export" to export a Client- or QCW-Style
with all templates in EE4P format. Style pack-
ages of this format can be imported via 'Actions'.
‘Actions’
Select ‘Add Current Presentation to Templates’
to add your active presentation to the chosen
style.
Click on ‘Import Style Package’ to import an
EE4P-Style package.
Check
Check your presentation for compliance with
your company’s corporate design and interac-
tively fix any issues with just one click. More than
25 rules – and your custom rules if needed:
▪ Corporate colors
▪ Corporate fonts
▪ Bullet formats
▪ Orphaned footnotes
▪ Double or missing spaces
▪ Proofing languages
Additional clean-up features – just one click
away:
▪ Remove all speech notes to avoid inad-
vertently conveying confidential infor-
mation
▪ Remove all animations
▪ Remove unused designs from the current
presentation to reduce file size

20
Reference · Presentation
Efficient Elements. Click. Done.
Save and Send
Entire Presentations
▪ Save current presentation as new
presentation
▪ Send current presentation as attach-
ment per e-mail
▪ or copy to clipboard
Selected Slides
▪ Extract and save the selected slides to a
new presentation
▪ Extract and send selected slides as at-
tachment per e-mail
▪ or copy on clipboard

21
Reference · Wizards
Efficient Elements. Click. Done.
Wizards
Agenda Wizard
Create or update agenda slides automatically. In
the following the individual functions/options
are explained in detail:
1. Insert additional agenda (e.g. if you have
a meeting taking place for multiple days).
Label each agenda by clicking into the
field next to ‘Agenda Name’. To insert a
Title and Subtitle on the agenda separat-
ing slides, click in the fields for ‘Title’ and
‘Subtitle’ respectively.
2. Choose one of the following ‘Actions’:
Delete, import and export agenda. The
latter are useful if you would like to reuse
an existing agenda from a different
presentation.
3. Pick layout and sizing mode (e.g.
whether or not to auto collapse sub-
items). The available layouts depend on
your customization. In most cases you do
not need to adjust the option for ‘Font
Size’.
4. Select the desired columns: Responsi-
ble, Time Slot and/or Page number. The
‘Free Column’ lets you ad d another col-
umn for additional information (e.g. par-
ticipants or location).
5. Set time format (24h, AM/PM or minutes)
and start time. In case your agenda lay-
out includes an item number, you can
choose at which number to start. The lat-
ter can be useful if you have a multi-day-
agenda and would like to continue the
numbering throughout the agendas for
each day.
22
Reference · Wizards
Efficient Elements. Click. Done.
6. Add agenda item.
7. Move items up and down to reorganize
your meeting/presentation. The content
slides will be moved automatically.
8. Decrease/increase indent-level to create
sub-items.
9. Delete agenda item.
10. Click on an empty row to create a new
agenda item (alternative to ‘Add Item’)
11. Set the duration of the agenda item. Ei-
ther use the up/down buttons or enter a
number directly.
12. Check to generate agenda overview slide
without highlighting of current item.
13. Check to generate agenda separating
slides.
14. Check to connect each agenda item to a
PowerPoint section (PowerPoint func-
tion to organize your presentation).
15. Check to create backup slide. The
backup slide separates the content
slides of the last agenda item from the
backup slides. This option is necessary to
make sure your backup slides are not
mixed with your content slides in case
you reorganize your presentation.
16. Check ‘Break’ to indicate a coffee or
lunch break. This option will change the
format of the agenda item, (e.g. no item
number).
17. Uncheck ‘Show Agenda Item’ to insert a
‘hidden’ agenda item. This can be useful
if you want to have a gap in the auto-
matic calculation of the time slots.
18. Uncheck ‘Generate Separating Slide’ to
not generate a separating slide for the
current item (e.g. a coffee break or sub-
item). This can be useful to reduce the to-
tal number of slides in a presentation.
HINTS:
▪ Use <tab> / <shift+tab> to jump between
cells
▪ Click on an empty row to create a new
agenda item
▪ Click <Enter> to insert a line break
▪ Page numbers will be automatically up-
dated upon saving; alternatively you can
click on ‘Agenda’ pull down menu - ‘Up-
date Page Numbers’
▪ Use the ‘Free Column’ to add information
such as participants or location
▪ When moving agenda items up or down
the corresponding content slides will be
moved as well
▪ Use the ‘Backup’ slide to separate back-
hand slides
▪ Click on ‘Agenda’ pull down menu - ‘Move
Selected Slides to End of Presentation’ to
sort out slides to the ‘Backup’ section
Master Wizard
This function can be enabled on request.
Replace elements in all slide masters at once,
such as confidentiality levels, copyright notices
or logos. The content of the Master Wizard de-
pends on your individual customization.
23
Reference · Wizards
Efficient Elements. Click. Done.
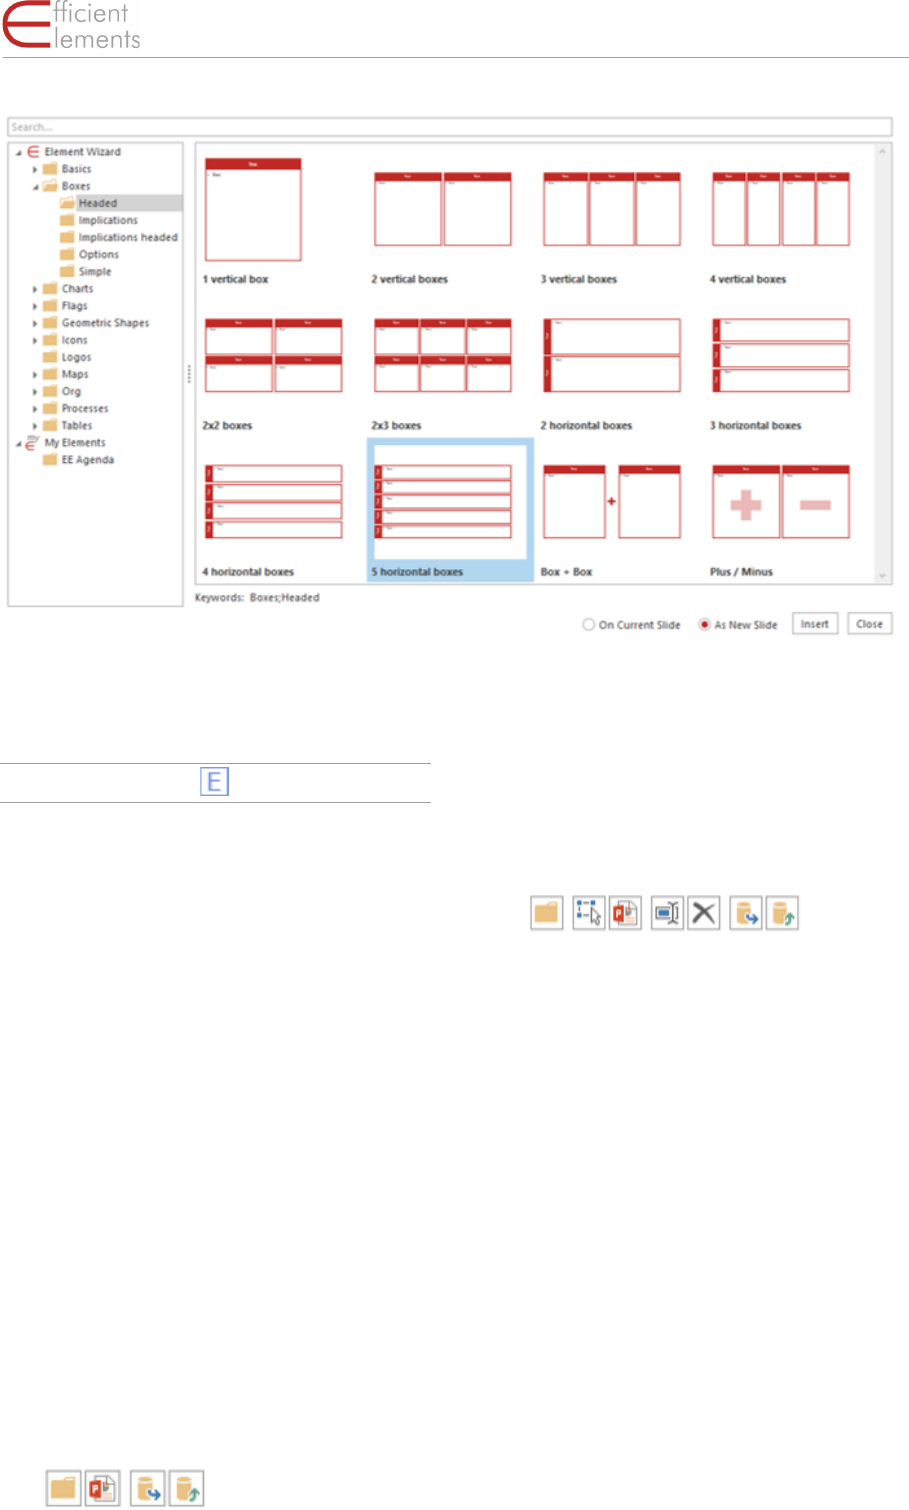
Element Wizard
Insert an element from the Element Wizard li-
brary on the current slide. In the following the in-
dividual functions/options are explained in de-
tail:
1. The upper part of the ‘Element Wizard’
menu contains the Element Library struc-
tured into several sub-menus. The contents
depend on your individual customization.
Some Elements have a fixed position and
size (e.g. stickers) others can/should be ad-
justed after inserting them (e.g. icons, ta-
bles).
2. The content of each sub-menu is displayed
in a gallery to facilitate the search for your
desired elements.
3. You can store your own individual elements
in the ‘My Elements’ section. Once added,
the elements will also be displayed in an el-
ement gallery.
4. To add another entry to ‘My Elements’, click
on ‘My Elements’ and
4.1. create a new folder
4.2. add presentation from file
4.3. Export selected folders or elements to
ZIP
4.4. Import elements from ZIP
5. Choose a folder with ‘My Elements’ and
5.1. add a new subfolder
5.2. add selected elements from current
presentation
5.3. add the current presentation
5.4. rename folder / elements
5.5. remove folder / elements
5.6. export selected folders / elements to
create a ZIP-file you can send to your
colleagues
5.7. import element by selecting the re-
spective ZIP-file. In case there are ele-
ments with the same name in the im-
port file, you will be asked if you would
like to replace the existing element or
import a duplicate.
5.8. Rearrange your elements per drag &
drop

24
Reference · Wizards
Efficient Elements. Click. Done.
Text Wizard
Insert a text snippet or symbol from the Text Wiz-
ard at the current cursor position. In the follow-
ing the individual functions/options are ex-
plained in detail:
1. The upper part of the ‘Text Wizard’ menu
contains the Text Snippet Library struc-
tured into several sub-menus. The con-
tents depend on your individual custom-
ization. Text snippets can range from
multiple lines of text to a single charac-
ter. They can either be plain unformatted
text or contain formatting.
2. You can store your own individual text
snippets in the ‘My Texts’ section.
3. To add another entry to ‘My Texts’, select
the desired range of formatted or unfor-
matted text and click on ‘Add Selection
to “My Texts”…’
You can choose to save the text snippet
with its formatting for font, font size,
bold, italic and/or underlined. If neces-
sary, you can edit text and formatting in
the ‘Add to My Texts…’ dialog
4. Click on ‘Manage “My Texts”…’ to organ-
ize, import and export your text snippets.
You can rename text snippets, edit the
text or formatting, assign them to a differ-
ent group, sort them alphabetically or
delete them.
Sample text
© 2014 Sample
company
1
2
3
4

25
Reference · Wizards
Efficient Elements. Click. Done.
Check the boxes next to each text snippet
to select them for export. Click on ‘Ex-
port’ to create a ZIP-file you can send to
your colleagues. To import elements,
click on ‘Import’ and select the respective
ZIP-file. In case there are text snippets
with the same name in the import file,
you will be asked if you would like to re-
place the existing text snippet or import
a duplicate.
HINT: The content of the Text Wizard depends on
your individual customization.
26
Reference · Wizards
Efficient Elements. Click. Done.
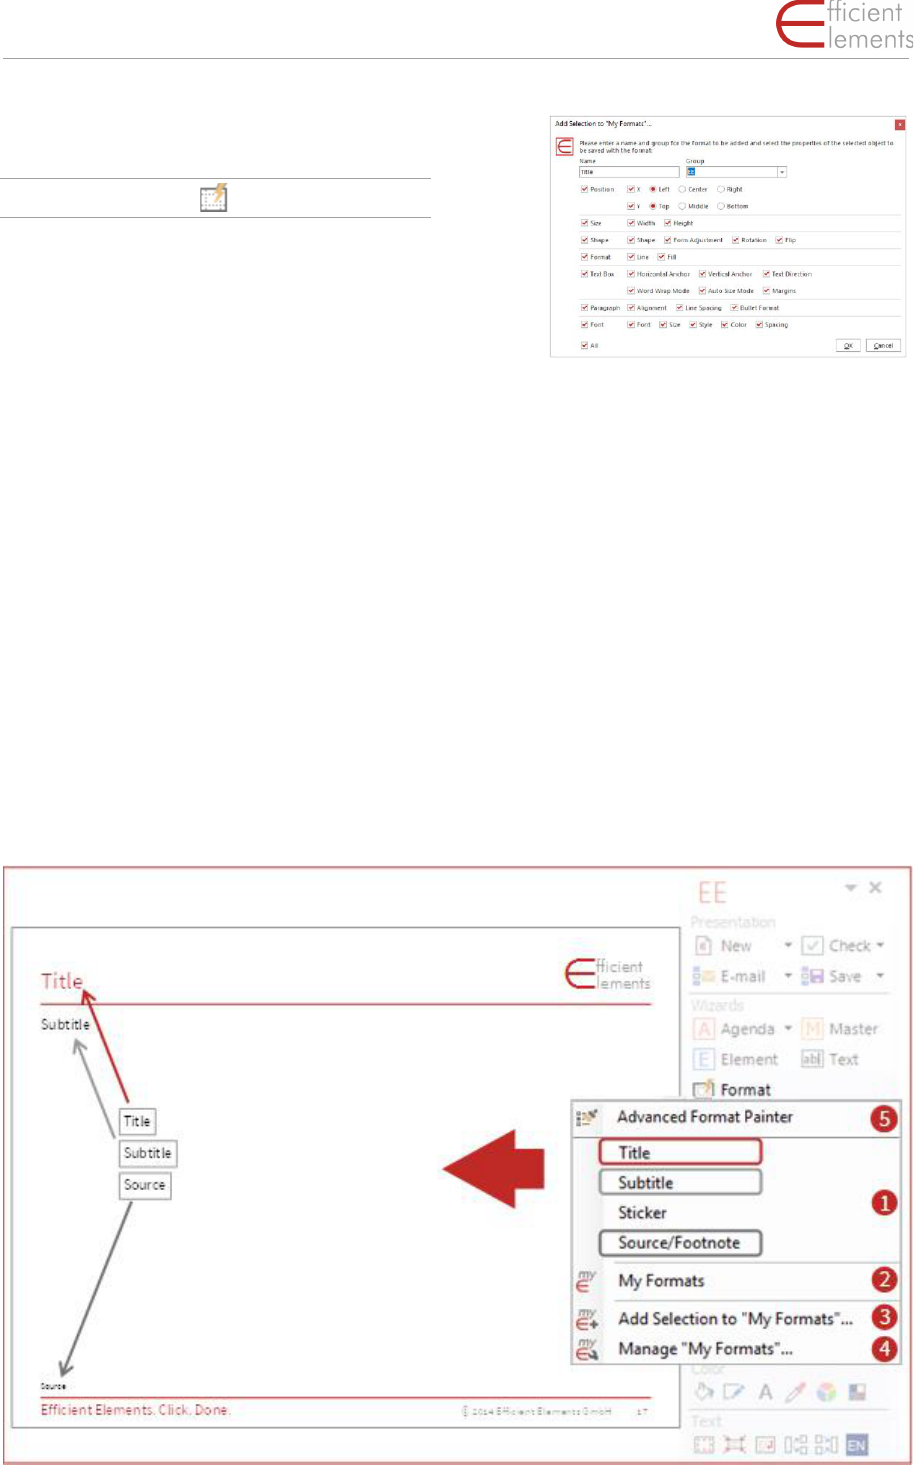
Format Wizard
Format and/or position the selected objects
based on a Format Wizard template. In the fol-
lowing the individual functions/options are ex-
plained in detail:
1. The upper part of the ‘Format Wizard’
menu contains the Format Library struc-
tured into several sub-menus. The con-
tents depend on your individual custom-
ization. The predefined formats can have
different attributes which can range from
a position or a font size to a combination
of most of the format attributes available
in PowerPoint (see below for more de-
tails).
2. You can store your own individual ele-
ments in the ‘My Formats’ section.
3. To add another entry to ‘My Formats’, se-
lect the element that has been formatted
as desired and click on ‘Add Selection to
“My Formats”…’.
You can choose which format attributes
of the selected element to save (see illus-
tration above). For instance, if you would
like to save a format for an element with-
out any given position – this can be use-
ful if you do not wish to alter the position
of an element later – deselect the bullets
for position. The default selection of at-
tributes will fit for most formats you
might want to save.
4. Click on ‘Manage “My Formats”…’ to or-
ganize, import and export your individu-
ally defined formats:

27
Reference · Wizards
Efficient Elements. Click. Done.
You can rename elements, assign them
to a different group, sort them alphabet-
ically or delete them.
Check the boxes next to each element to
select them for export. Click on ‘Export’
to create a ZIP-file you can send to your
colleagues. To import formats, click on
‘Import’ and select the respective ZIP-
file. In case there are formats with the
same name in the import file, you will be
asked if you would like to replace the ex-
isting format or import a duplicate.
5. Right at the top of the ‘Format Wizard’
menu you find the Advanced Format
Painter which helps you to transform se-
lected formats and positions on the fly to
the objects you mark.
HINT: You can transform the selected format
through the presentation and all slides until
you press ‘ESC’
The content of the Format Wizard depends on
your individual customization
28
Reference · Smart Elements
Efficient Elements. Click. Done.
Smart Elements
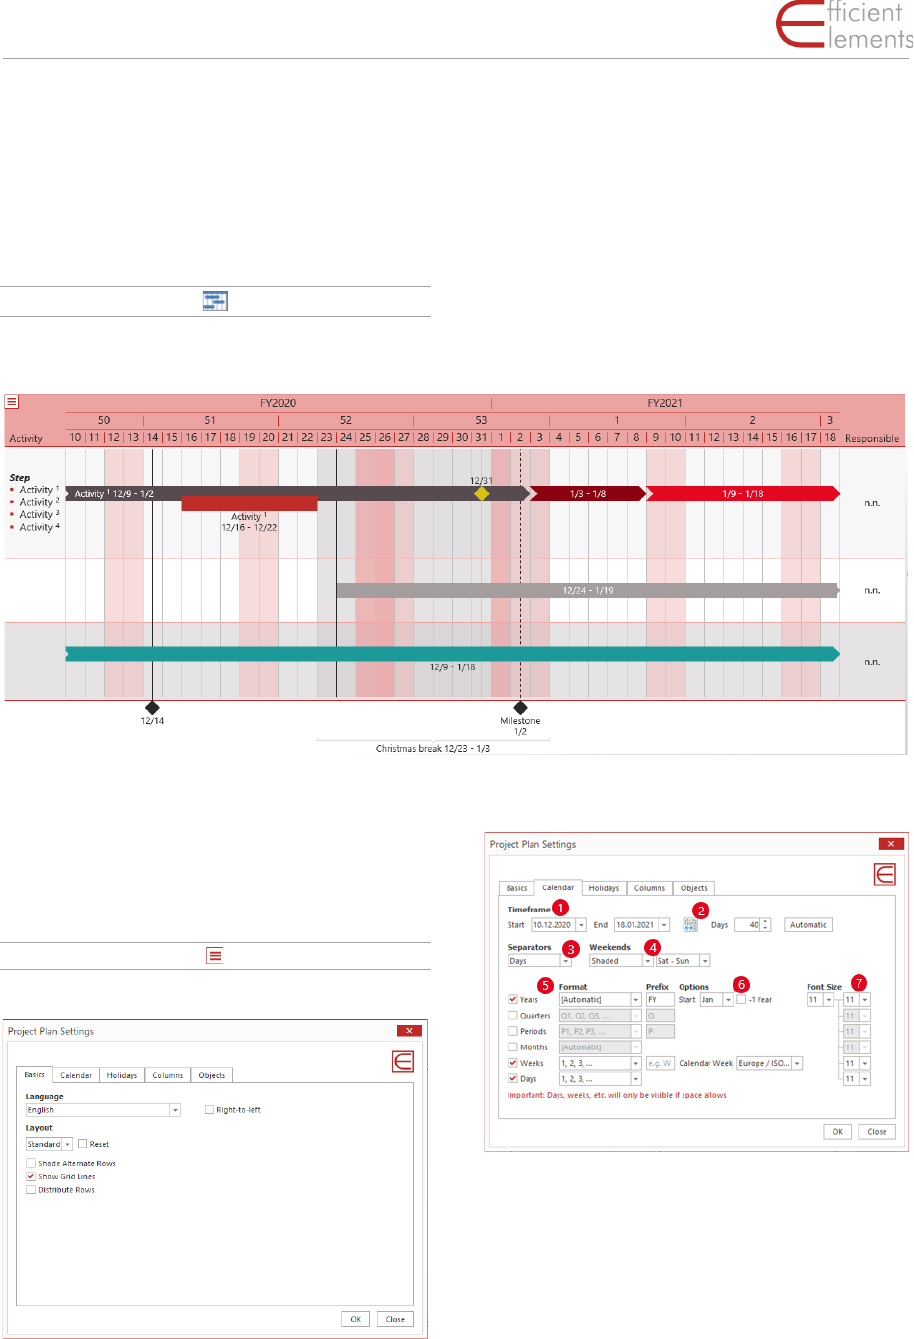
Project plan (Gantt Chart)
Create detailed project plans with just a few
clicks.
In the following the individual functions & op-
tions are explained in detail:
Settings
Basics
▪ Change language and layout
▪ Check right to left
▪ Check Shade Alternate Rows, Show Grid
Lines, Distribute Rows
Calendar:
1. Start and End
2. Move project including all items
3. Show separators (lines) between chosen
time period.
HINT: If the period is too long, days may
not be displayed.
4. Weekends shaded or not (choose day/s
of the week)
5. Check classification of periods and for-
mat
6. Settings for the fiscal year
7. Font size of calendar (header)
29
Reference · Smart Elements
Efficient Elements. Click. Done.
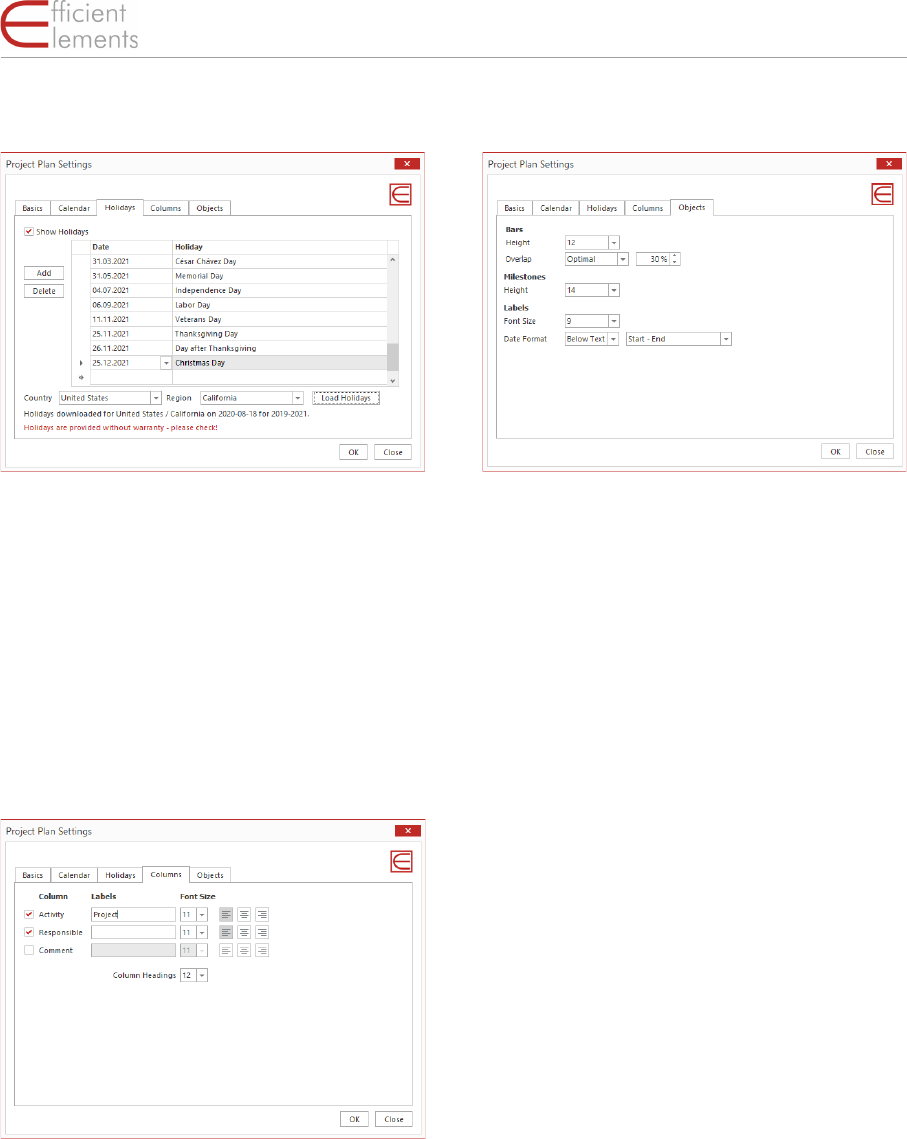
Holidays
▪ Check “Show Holidays” and the loaded
or added holidays will be shown as
shade in your project plan
▪ Add your holidays
▪ Delete loaded or self added holidays
▪ Choose country and region
▪ Load holidays
HINT: they are provided without warranty
– please check
Columns
▪ Check Activity (left column)
▪ Check Responsible (right column)
▪ Check Comment (additional right
column)
▪ Change the name of column (heading)
▪ Choose font size for text of columns
▪ Choose font size for column headings
Objects
▪ Choose height of objects (items) as
bars, arrows and chevrons
▪ Overlap:
▪ optimal
(select the percentage overlap)
▪ cascade
(select the percentage overlap)
▪ full
▪ Choose height of milestones
▪ Choose font size of labels
▪ Choose position of date
▪ Hide
▪ Before Text (label)
▪ After Text (label)
▪ Above Text (label)
▪ Below Text (label)
▪ Choose format of date
▪ Start
▪ Start – End
▪ Start – End (days)
▪ Start – End (working days)
▪ Start – End (2 lines)
▪ Days (number of days)
▪ Working days (number of days)
30
Reference · Smart Elements
Efficient Elements. Click. Done.
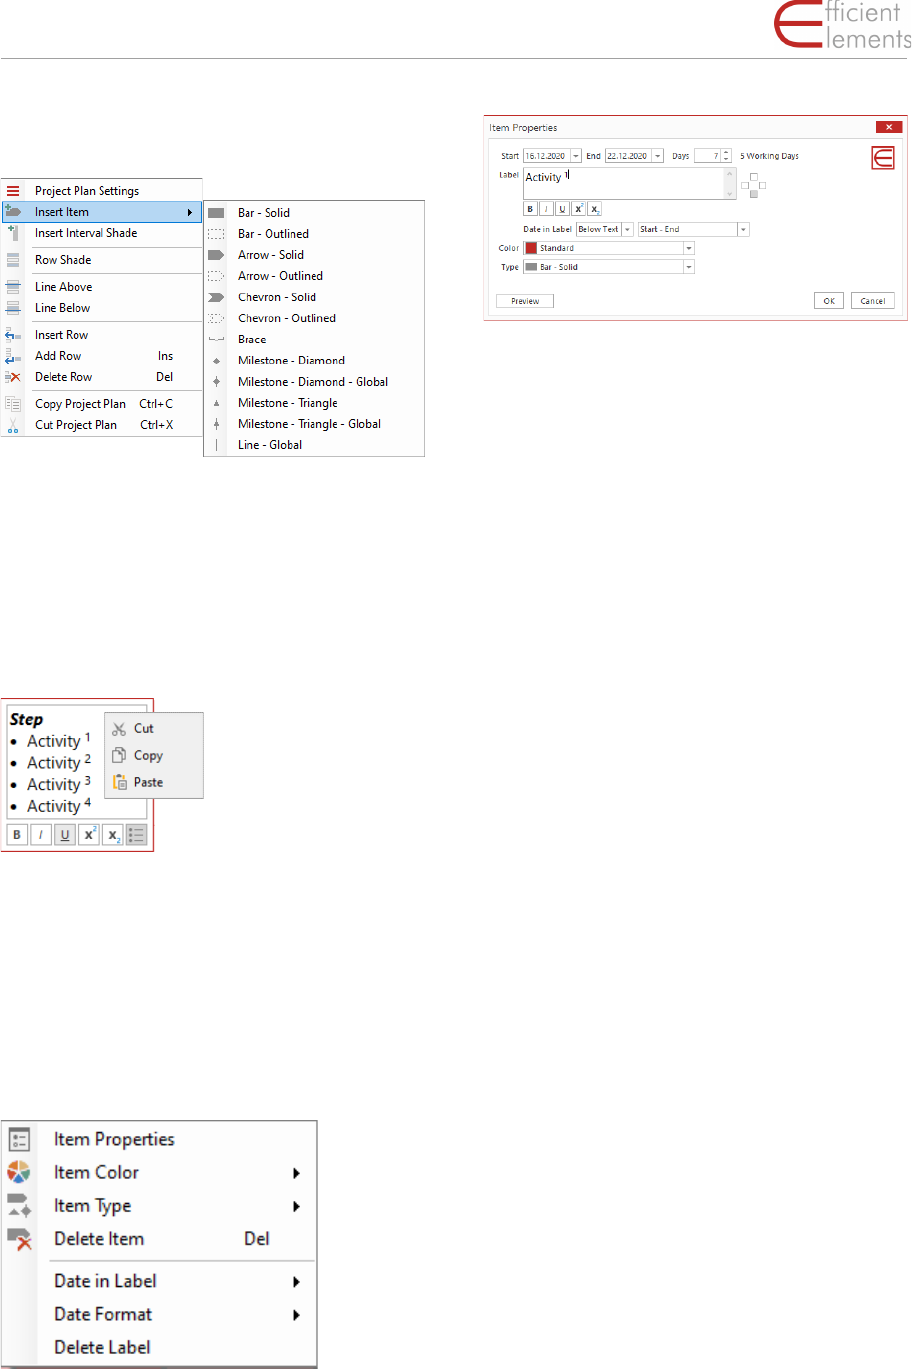
Content settings
With a right-click into the content area this set-
tings will appear. Use this menu to insert items,
interval shades, row shades, lines etc.
Add text to columns
Write text to the cell of a column and set bullet
points and format the text. With a right mouse
click into the text field selectet text can be cop-
ied or cut and then be pasted it into another text
field.
Format items and labels
With a right-click into an item view the options to
format items and labels.
Within the properties
▪ rework the timeframe
▪ add text to label
▪ change position and format of the label
▪ dye items in another color
▪ change items type
HINT: the position of the label in rela-tion
to the object depends of the with of item
and format of label, especially when la-
bel should be centered on the item.
Quick Overview
1. To add text in the left or right column,
click into the cell.
2. To insert items, lines, rows etc. right-
click on the calendar area.
3. Edit items with a right-click and drag
them to the desired position.
4. To copy rows and / or items select them
with CTRL and drag them to the new po-
sition.

31
Reference · Position
Efficient Elements. Click. Done.
Position
Align
Align all selected objects to the respective edge
of the ‘Master’.
The ‘Master’ is always the object that you se-
lected last.
If only one object is selected, the object is
aligned to the respective edge of the slide.
Distribute Horizontally
Distribute the selected objects horizontally. The
leftmost and rightmost objects keep their posi-
tions, the spaces between all objects in between
are distributed evenly.
Distribute Vertically
Distribute the selected objects vertically. The
topmost and bottommost objects keep their po-
sitions, the spaces between all objects in be-
tween are distributed evenly.
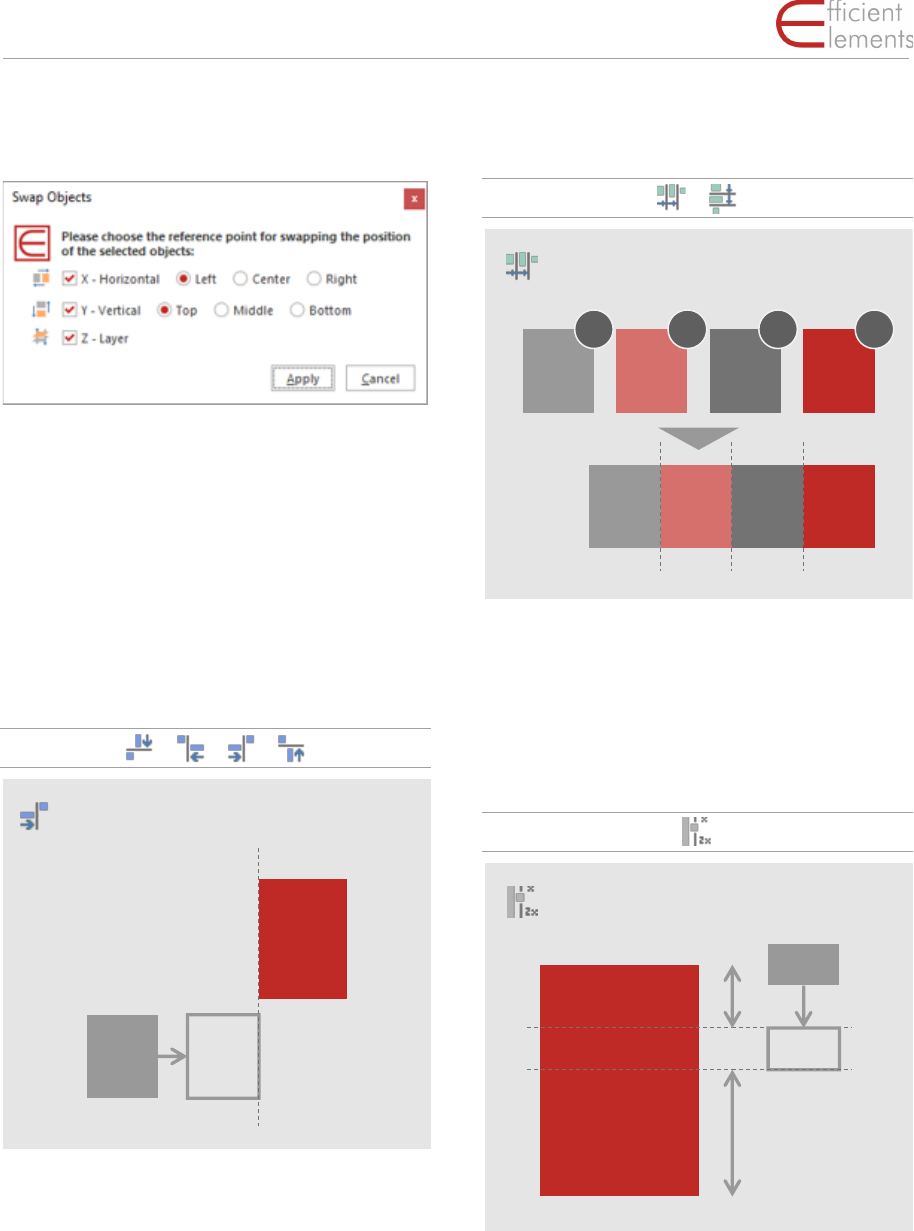
Swap
Swap two selected objects. You can specify rela-
tive to which corner or edge the objects should
Align right
Master
Shape
Distribute vertically
32
Reference · Position
Efficient Elements. Click. Done.
be swapped, and whether also the layer position
should be swapped.
When the objects to be switched are identical in
shape and size, it does not matter which refer-
ence point you choose. The layer position de-
fines which object is in the foreground and
which object is in the background. As a default
the layers will be switched as well, as this is the
correct option in most cases.
Dock
Move the selected objects in the respective di-
rection until they touch the ‘Master’.
The ‘Master’ is always the object that you se-
lected last.
Stack
Stack the selected objects horizontally / verti-
cally so that they touch each other. The stacking
takes place in the order of selection.
Golden Canon
Vertically align the selected objects in the
‘Golden Canon’ relative to the ‘Master’.
The ‘Master’ should be higher than the objects to
be aligned.
The objects will be aligned such that the margin
between object and ‘Master’ is twice the size at
the bottom compared to the top.
Dock right
Master
Shape
Stack horizontally
1. 2. 4.3.
Click
Align in Golden Canon
Master
Shape
33
Reference · Size
Efficient Elements. Click. Done.
The ‘Master’ is always the object that you se-
lected last.
HINT: The Golden Canon is used to arrange ob-
jects in a certain relation to one another that is
most pleasing to the eye.
Size
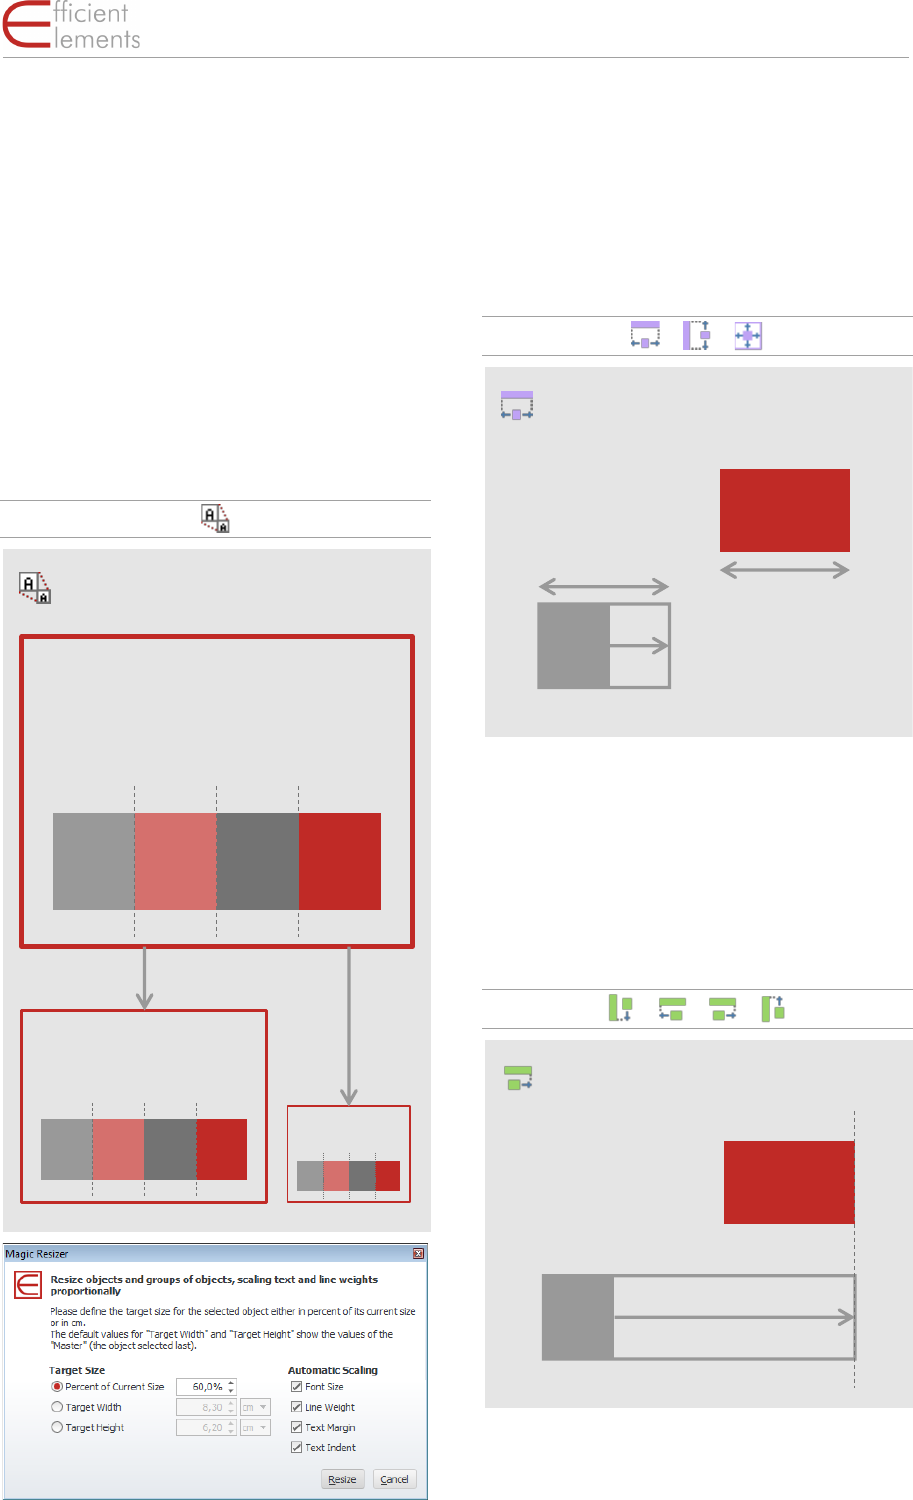
Magic Resizer
Resize the selected objects to a given absolute
or relative size. You can choose to which attrib-
utes the resizing factor should be applied.
Width / Height / Width and Height
Align the size of all selected objects to the size of
the ‘Master’, either for width, height, or both.
The ‘Master’ is always the object that you se-
lected last.
Stretch
Stretch the selected objects to the far edge of the
‘Master’.
Magic Resizer
Large font
Small font
Medium font
Large font
Small font
Medium font
Large font
Small font
Medium font
30%
60%
Align width
Master
Shape
Stretch right
Master
Shape
34
Reference · Shape
Efficient Elements. Click. Done.
The ‘Master’ is always the object that you se-
lected last.
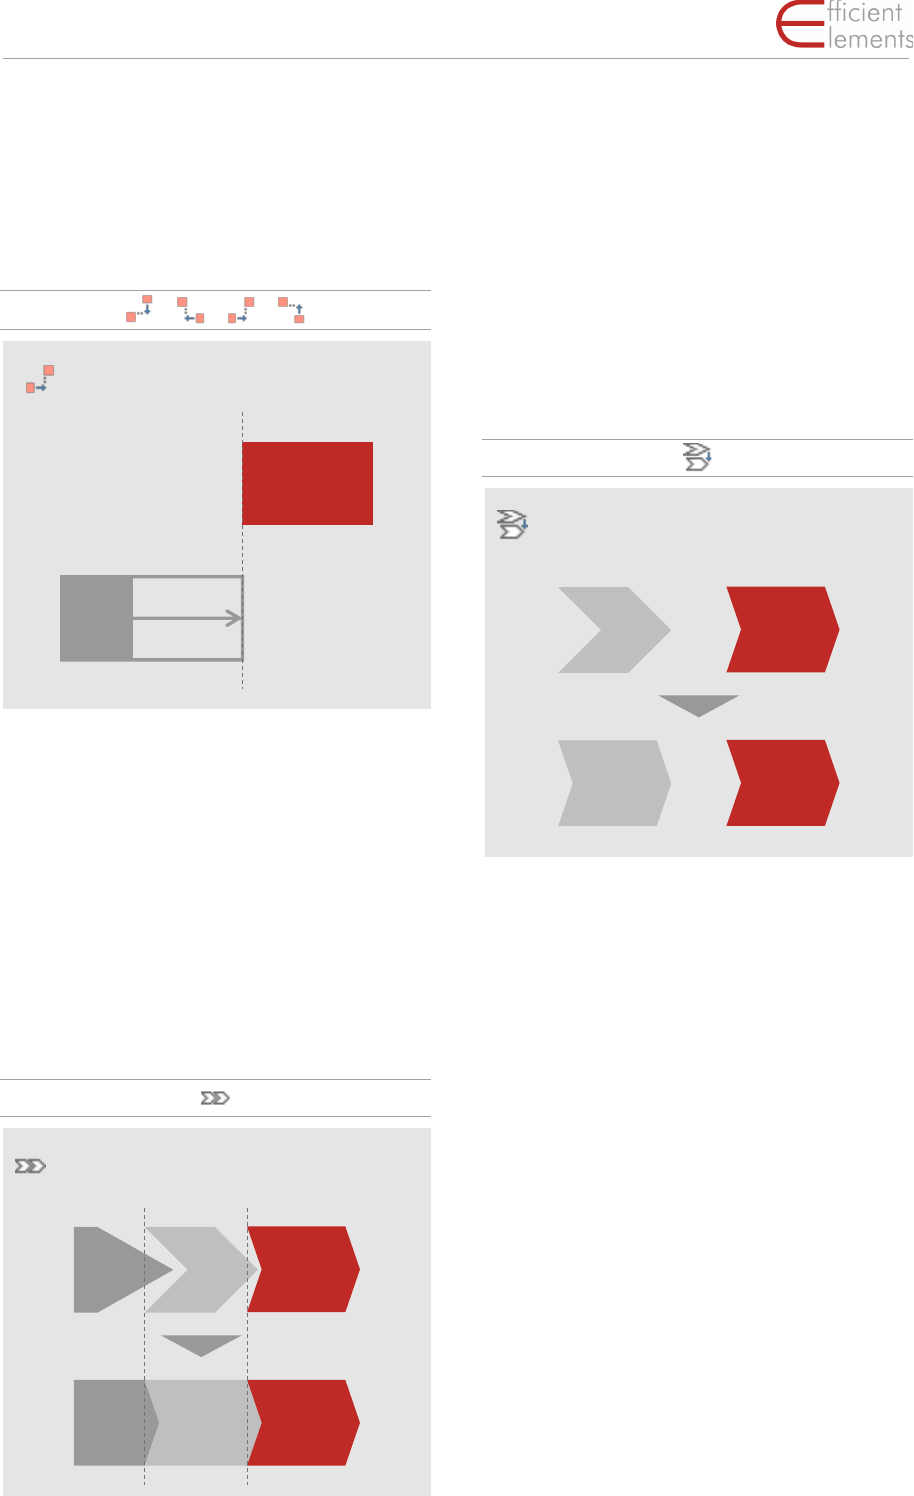
Fill
Fill the gap between all selected objects and the
‘Master’ (if any).
The ‘Master’ is always the object that you se-
lected last.
Shape
Align Process Chain
Align the selected block arrows to form a process
chain.
The block arrow selected last will define the an-
gle, the position and sizing for all other block ar-
rows in the process chain. The gaps between
block arrows are filled from left to right and from
top to bottom.
Align Angles
Align the angles of all selected block arrows to
the ‘Master’.
The ‘Master’ is always the object that you se-
lected last.
Fill right
Master
Shape
Process Chain
Master
Shape
Master
Shape
Align Angles
Master
Shape
Master
Shape

35
Reference · Shape
Efficient Elements. Click. Done.
Adjust Pentagon Headers
Adjust the header boxes of headed ‘Conclusion’
boxes (standard elements in the Element Wiz-
ard).
Select a pentagon (block arrow) and the corre-
sponding header box before using this feature.
Align Block Arrows
Apply a standard style to all selected block ar-
rows or define your own metrics based on the
‘Master’. The ‘Master’ is always the object that
you selected last.
Align Rounded Rectangles
Define the radius for the selected rounded rec-
tangles or use the ‘Master’ object’s value.
The ‘Master’ is always the object that you se-
lected last.
Adjust Pentagon Header
Align Block Arrows
Master
Shape
Align Rounded Rectangle
Radius
Master Shape
36
Reference · Color
Efficient Elements. Click. Done.
Color
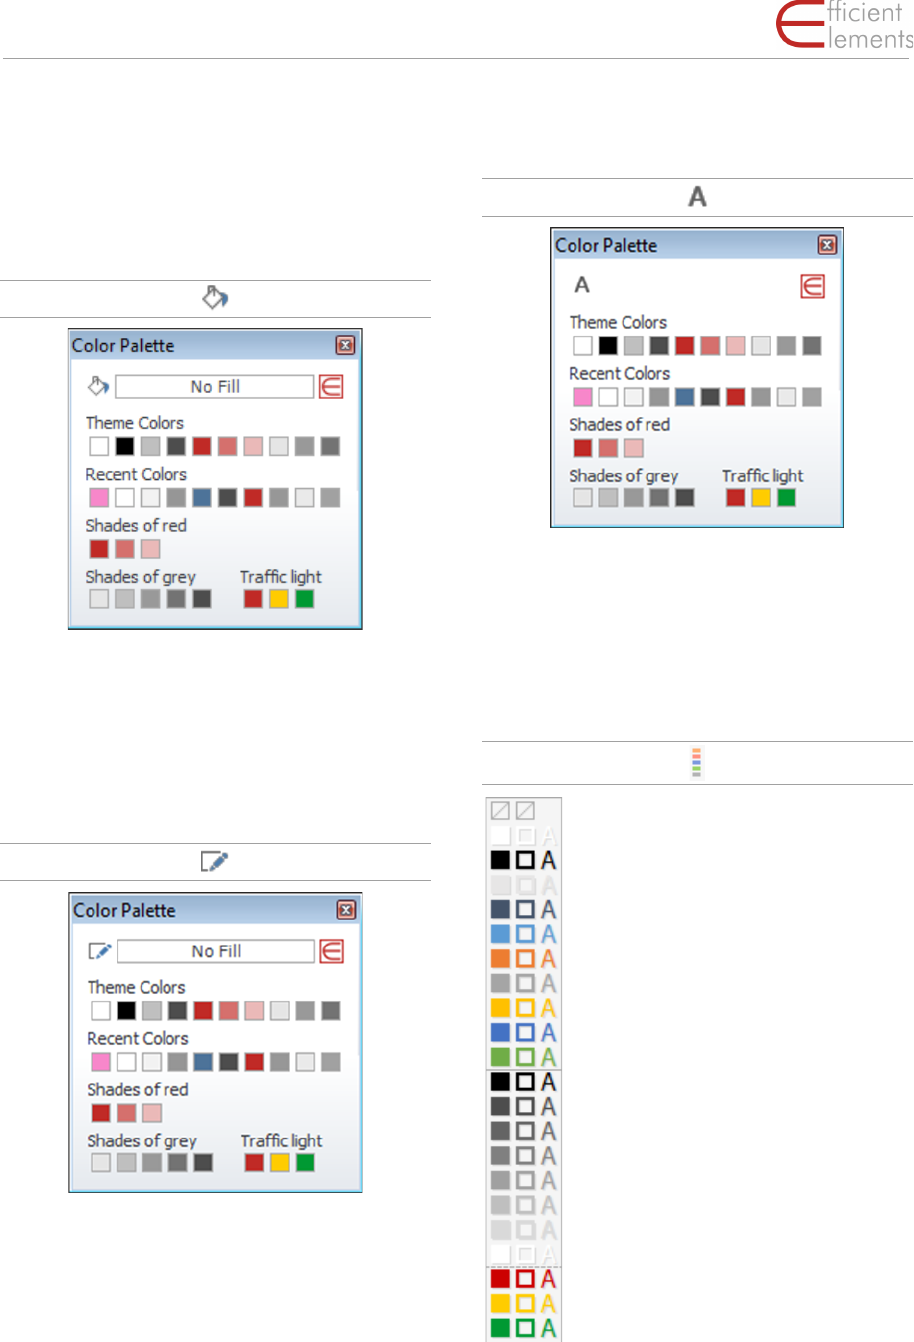
Set Fill Color
Set the fill color of all currently selected objects.
Available colors depend on your individual cus-
tomization.
Set Line Color
Set the line color of all currently selected ob-
jects. Available colors depend on your individual
customization.
Set Font Color
Set the font color of all currently selected ob-
jects. Available colors depend on your individual
customization.
Color Bar
With the Color Bar, all corporate col-
ors are directly available. Within the
customization it is possible to define
several groups. The left column de-
fines the fill color, the middle column
defines the line color and the right
column defines the font color.
37
Reference · Text
Efficient Elements. Click. Done.
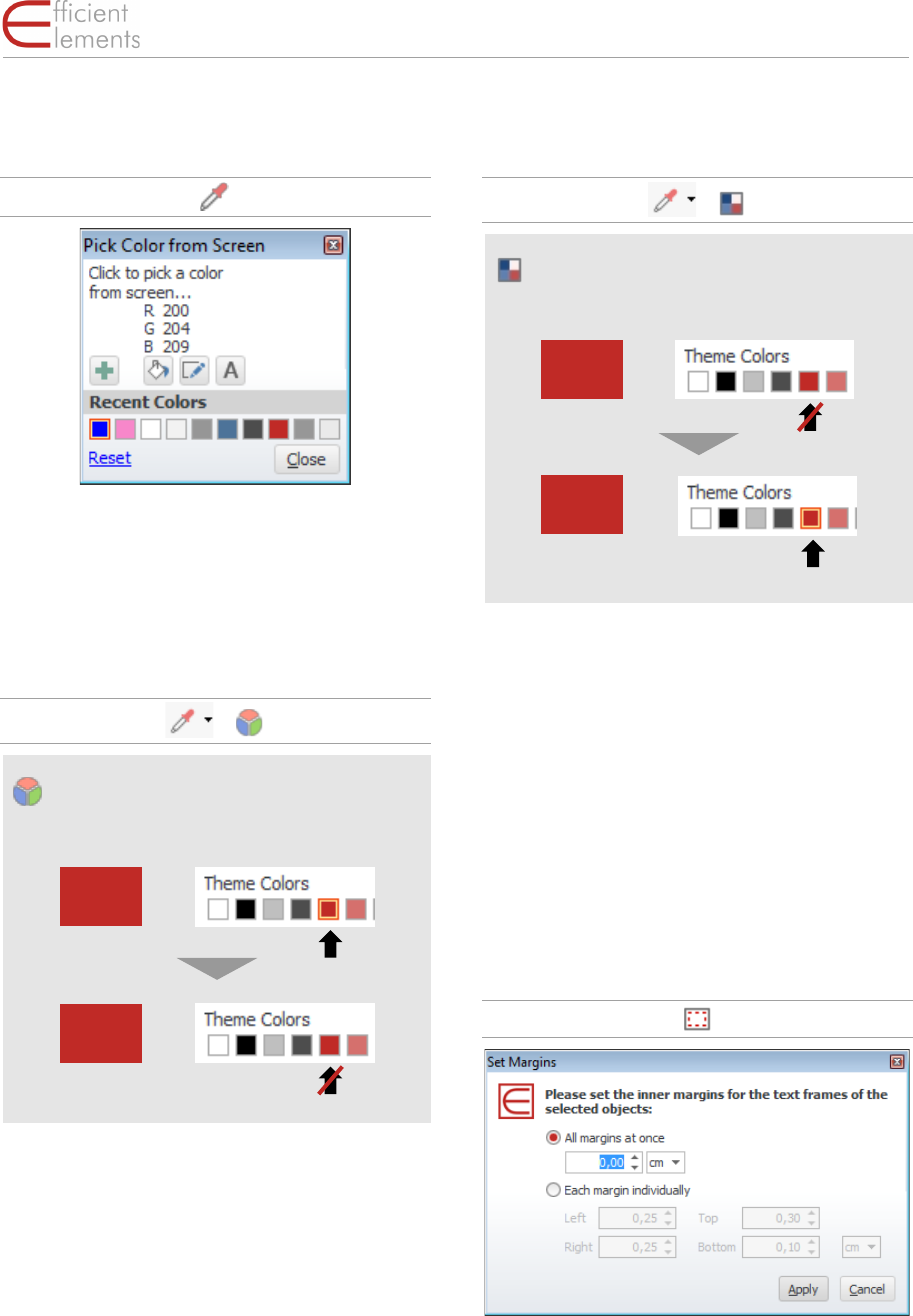
Pick Color from Screen
Pick any color from anywhere on the screen and
add it to the palette of recently used colors or
apply it to the selected objects.
Convert to RGB
Convert all theme colors in current selection to
RGB values.
This is useful if you would like to make the colors
independent of the slide master and theme
used.
Convert to Theme Colors
Convert all matching RGB values in current se-
lection to theme colors.
This is useful if you would like the colors to auto-
matically adapt to the slide master and theme
used.
Text
Set Margins
Set the margins of the selected text box or shape,
either all margins at once or each margin indi-
vidually.
Convert to RGB
Shape
Shape
Convert to Theme
Shape
Shape
38
Reference · Text
Efficient Elements. Click. Done.
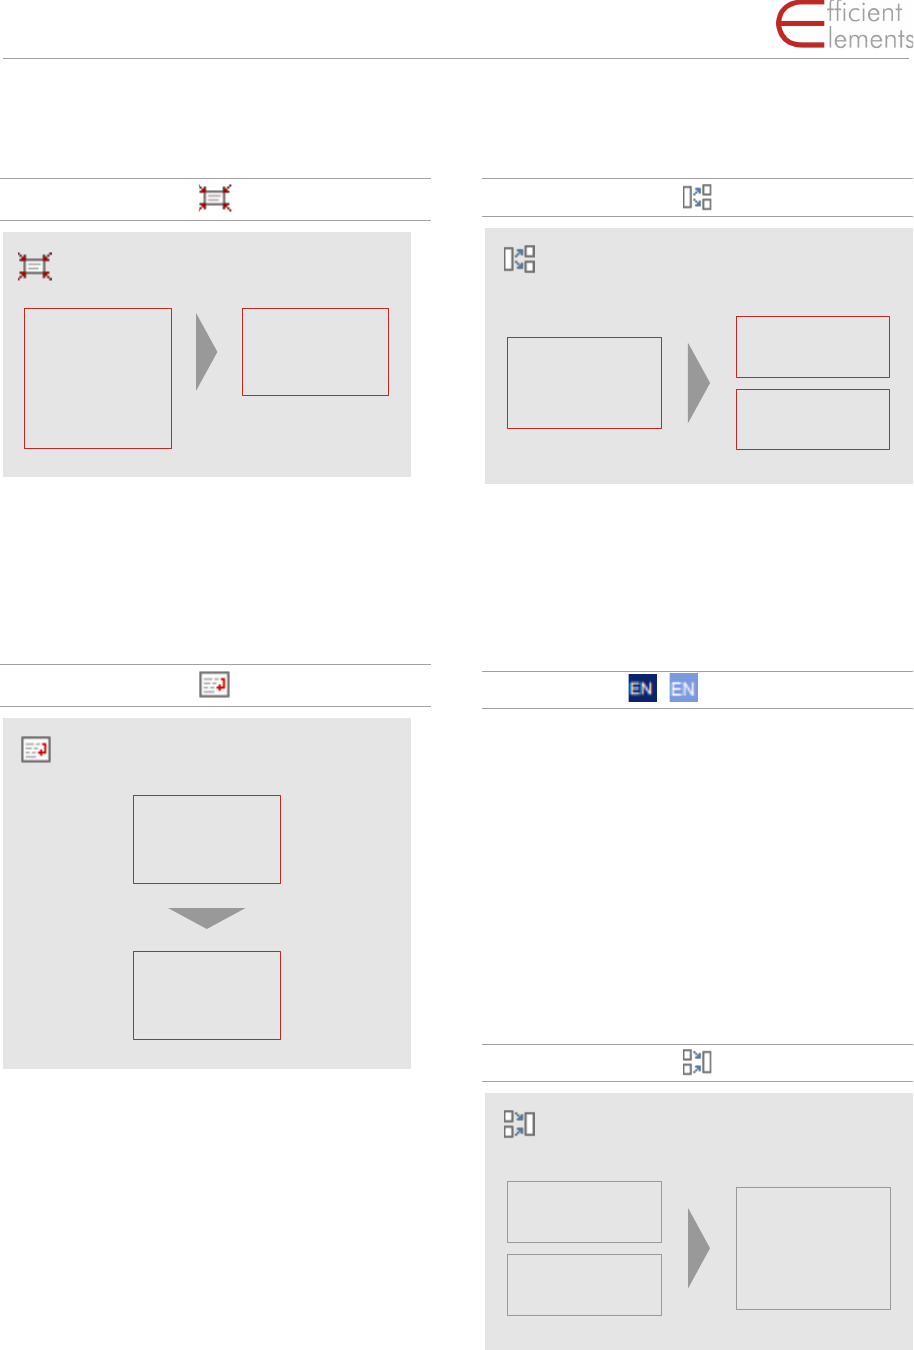
Fit Form to Text
Fit the size of the selected objects to the con-
tained text.
Wrap Text
Wrap the text within the selected objects.
Split Text Box
Split the selected text box at the cursor position
to create two separate text boxes.
Spell Check
…
Dark blue: Set the spell checking language for
the current selection to the language indicated
by the language code, e.g. EN for English, DE for
German.
Light blue: Set the spell checking language for
the entire presentation (all slides) and optional
as basis for the current presentation.
Merge Text Boxes
Merge the selected text boxes in a single text box.
The text boxes will be merged in the order they
were selected.
Fit Form to Text
ABCD EFG HI
JKLM NO
PQRST UVW
ABCD EFG HI
JKLM NO
PQRST UVW
Wrap Text in Form
ABCD EFG HI JKLM NO PQRST UVW
ABCD EFG HI
JKLM NO
PQRST UVW
Split Text Boxes
ABCD EFG HI
JKLM NO
PQRST UVW
ABCD EFG HI
JKLM
NO PQRST
UVW
Merge Text Boxes
ABCD EFG HI
JKLM
NO PQRST
UVW
ABCD EFG HI
JKLM
NO PQRST
UVW
39
Reference · Navigation & View
Efficient Elements. Click. Done.
Show / Hide Bullet / Numbering
Show/hide the bullets or numbering for the se-
lected paragraphs or objects.
The bullet/numbering format may depend on
the indent level.
The bullet types and indents depend on your in-
dividual customization.
Decrease / Increase Indent Level
Decrease/increase the indent level of the current
selection.
In addition to standard PowerPoint functional-
ity, this works across cells of tables as well.
The bullet types and indents depend on your in-
dividual customization.
Apply Default Bullets / Numbering
Apply default bullets/numbering to the current
selection.
The indent spacing is optimized based on the
font size. If there is more than one font size used
in a paragraph, the font size of the first character
will be used to calculate the indent spacing.
The bullet types and indents depend on your in-
dividual customization.
HINT: If you have trouble with getting the bullets
in your presentations to match your corporate de-
sign, you will love this feature. One click and your
bullets will appear as they should.
Navigation & View
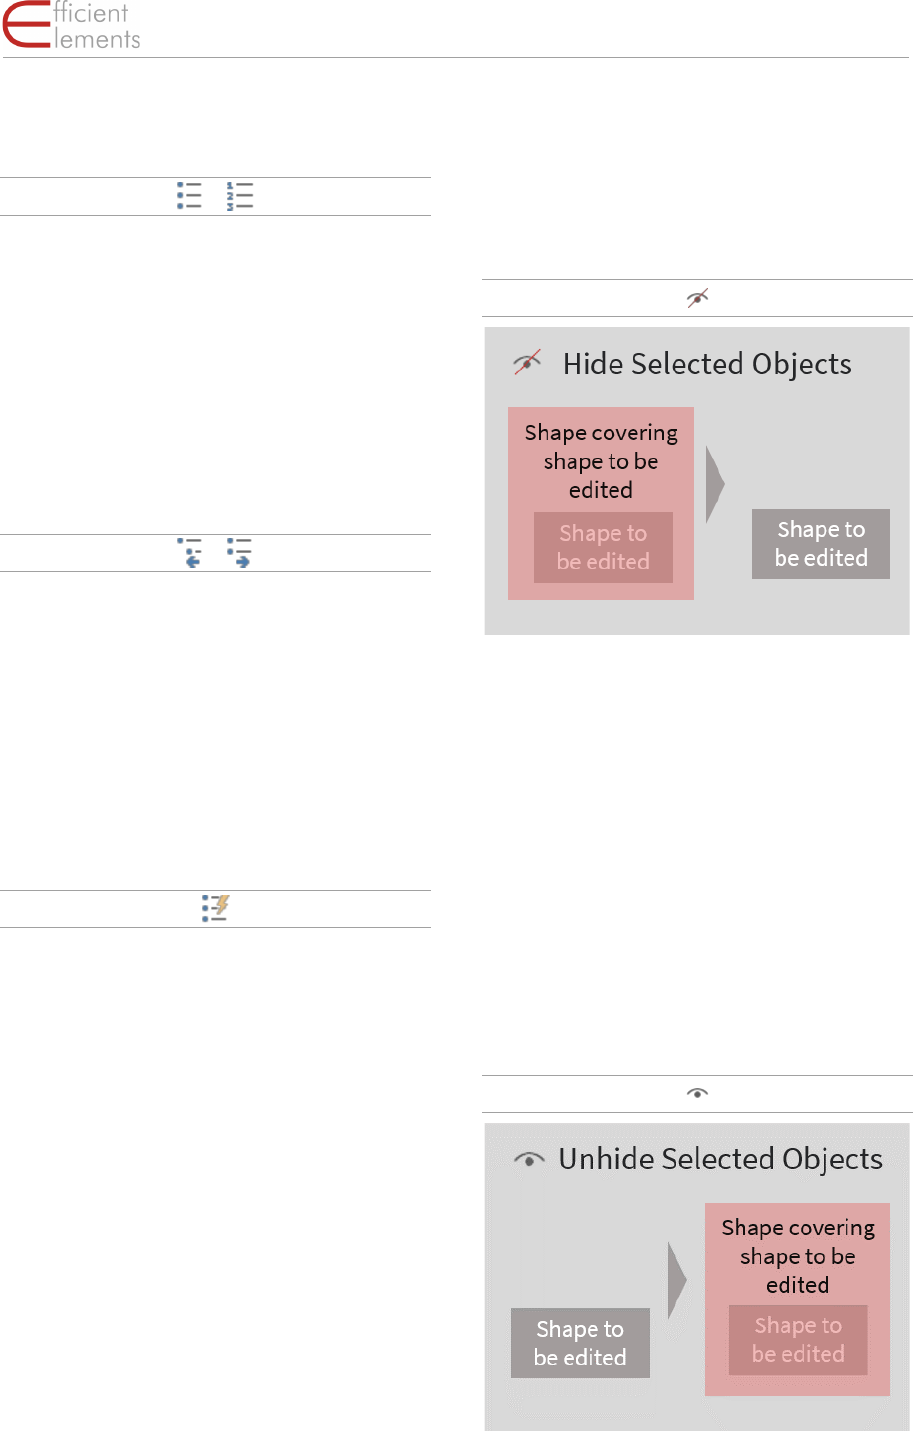
Hide Selected Objects
Hide all selected objects temporarily.
The objects will maintain their horizontal, verti-
cal and layer position while hidden.
Hidden objects can be shown again with the
command „Unhide Hidden Objects”.
This is particularly useful if you have a lot of over-
lapping or layered objects on a slide. You can
easily get rid of everything that is in the way for
editing with „Hide Selected Objects” and get it
back with „Unhide Hidden Objects”.
Unhide Hidden Objects
Unhide all temporarily hidden objects in the se-
lected slides and restore their original position.
40
Reference · Expert Tools
Efficient Elements. Click. Done.
This is particularly useful if you have a lot of over-
lapping or layered objects on a slide. You can
easily get rid of everything that is in the way for
editing with „Hide Selected Objects” and get it
back with „Unhide Hidden Objects”.
Go to Slide
Enter the number of the slide in the text field and
press „Enter” to go to any given slide in the cur-
rent presentation.
History – Previous / Next Slide
Go to previous / next slide in history.
Expert Tools
Insert Selected Slides as Pictures
Insert the selected slides as pictures on a blank
slide. The size of the pictures will be automati-
cally adjusted to fit all pictures on a single slide.
Show / Hide Slide Size
Show or hide the size of all embedded objects
(images, sounds, videos, etc.) on each of the
slides in the presentation.
Delete Redundant Masters
Delete all slide masters except the first one and
try to find the best matching layout for all slides
migrated to the first master. Migrated slides will
be marked and need to be checked manually.
Copy Summary to Clipboard
Copy the slide titles of all selected slides to the
clipboard as a summary.

41
Reference · Expert Tools
Efficient Elements. Click. Done.
Optimize Free form
Optimize the selected free forms.
Select Similar Shapes
Select all shapes on the current slide that are
similar to the currently selected shape. You can
define a set of criteria for the shapes to match
e.g. shape type or fill color.
Delete or Replace All Texts
Delete or replace texts in all text frames within
the current selection. Caution: In case of multi-
slide selections this applies to all selected slides!
Decompose Tables
Decompose the selected tables and convert
them to individual objects.
Paste on Selected Slides
Paste the current contents of the clipboard on
all selected slides.
Create Motion Path
Create an animated motion path between two
selected objects. The object selected first will be
animated to move to the location of the object
selected last.
You may want to create a copy of the object to
be animated, position the copy at the target po-
sition of the animation, apply this function and
afterwards delete the copy again.
Create Motion Path
42
Reference · Admin Tools
Efficient Elements. Click. Done.
Print Only Used Notes Pages
Open the print preview for notes pages and pre-
select only used notes pages for printing.
Set Black and White Mode
Set the black and white mode for the current se-
lection or the overall presentation.
This can be useful for optimizing the appearance
of the printed presentation on black and white
printers.
Find in Windows Explorer
Find the current presentation in Windows Ex-
plorer.
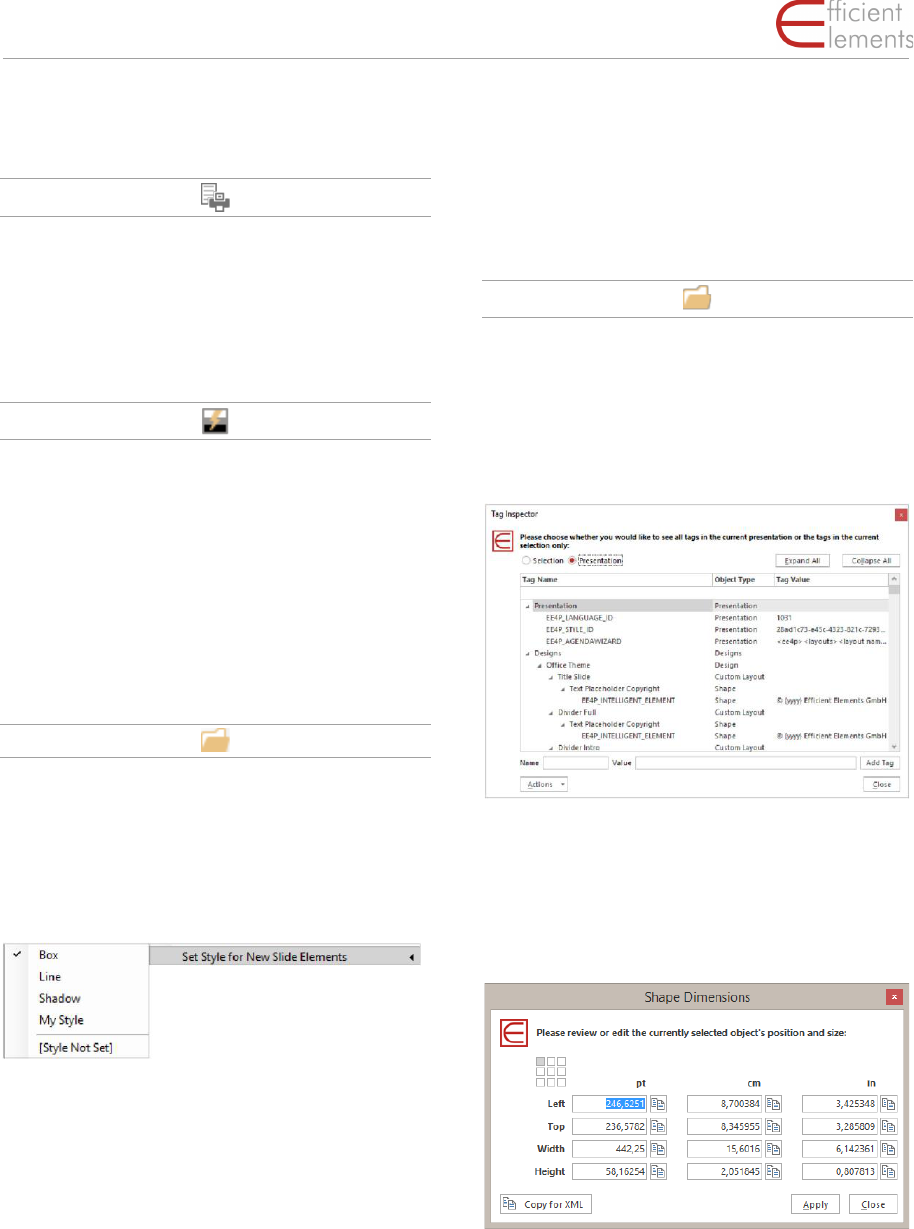
Set Style for New Style Elements
Choose the style you whish your new slide ele-
ments to be referred.
Apply Template to Current Presenta-
tion
Open dialog to choose a template to be applied
to your current presentation.
Admin Tools
Update Thumbnails
Update thumbnail images for Element Wizard
and Map Wizard.
Tag Inspector
Add, edit or delete tags for the current presenta-
tion or selection.
Shape Dimensions
Show and edit the currently selected object’s
position and size in pt, cm or in.
43
Reference · Admin Tools
Efficient Elements. Click. Done.
Single Out Objects on Selected
Slides
Distribute multiple objects from one slide to
multiple slides with one object per slide.
This is useful to prepare your slide element col-
lection before integrating them in the Element
Wizard.
Open EE Folders
Open a specific Efficient Elements installation
folder for customization or bug fixing purposes.

44
Administration
Efficient Elements. Click. Done.
for presentations
fficient
lements
Administration
Customization
Efficient Elements shows its true potential, both in terms of slide quality and time saving, when it is
customized to your company’s corporate design. We highly recommend taking advantage of our cus-
tomization services – not because we are good sales people, but because it makes a lot of sense for you.
We offer the following options to customize Efficient Elements for presentations to your needs:
▪ Standard Customization
Adjustment of colors, sizes, positions, font, line weight etc. for Agenda Wizard, Element Wizard,
Format Wizard and Master Wizard (also available for multiple designs and PowerPoint ver-
sions).
▪ Element Wizard Extension
Extension of the Element Wizard’s contents by elements or templates specific to your com-
pany, such as pictures, logos or reporting templates.
▪ Custom Features
Implementation of additional tools and program features specific to your individual needs.
▪ Update service
Automatic distribution of updated templates to all users in your company.
Please contact us at info@efficient-elements.com to learn more about the customization options.
Deployment
If you would like to deploy Efficient Elements to multiple users in your company, we can offer you dif-
ferent installation packages.
We offer two standard Windows Installer Packages (MSI):
▪ Per-User Installation
To be installed from the end user’s account for the logged-on user only, no admin privileges
required.
▪ Per-Machine Installation
To be installed from an administrative account, admin privileges required.
If none of our standard packages works for you, we can also offer individual installation packages tai-
lored to your specific needs.
Please contact us at info@efficient-elements.com to learn more about the deployment options.

45
Support
Efficient Elements. Click. Done.
for presentations
fficient
lements
Support
Please also check our website at www.efficient-elements.com for further resources.
Frequently Asked Questions (FAQ)
If you have any questions on how to use Efficient Elements or how to solve a specific problem, please
visit our website at www.efficient-elements.com/faq to find the complete list of frequently asked ques-
tions and answers.
We continuously update the FAQ on our website. For many typical questions this will be the quickest
way to get an answer.
E-mail Support
You can of course always contact us directly if you have questions around Efficient Elements. Simply
send us an e-mail to info@efficient-elements.com and we will come back to you as quickly as possible,
often within hours or latest within a few days.
Training
We also offer online trainings on Efficient Elements. Please check our website at
www.efficient-elements.com/webinar for the next available date for a training or contact us at
[email protected] if you are interested in an individual training session for your company or
department.
